


TiDB is an open-source distributed SQL database built for cloud-native, data-intensive, and AI-driven applications. It is MySQL compatible and features horizontal scalability, strong consistency, and high availability. By leveraging a TiCDC replication solution for Open Mirroring, TiDB seamlessly integrates with Microsoft Fabric. This unlocks continuous, real-time data synchronization from any TiDB deployment environment into Microsoft Fabric OneLake, making your data instantly available for AI and analytics.
Open Mirroring is designed to enable Data ISVs and customers to extend Mirroring in Microsoft Fabric based on the open Delta Lake table format. This capability enables TiDB to write change data directly into a Mirrored Database in Microsoft Fabric based on the open mirroring public APIs. To learn more about Open Mirroring in Microsoft Fabric, please visit Open Mirroring in Microsoft Fabric.
In this post, we will detail the implementation of this open source integration solution and demonstrate how to configure each component, providing a detailed, step-by-step walkthrough.
Prerequisites
- Deploy a TiCDC cluster to connect to your TiDB cluster, regardless of its deployment pattern (TiDB Cloud or Self-Managed) or location (in any public cloud or on-premises). Alternatively, you can use the sandbox environment provided by TiDB Labs for evaluation purposes.
- A Microsoft Azure account with Fabric subscription and familiarity with Azure services, specifically Entra ID, Storage service Blobs container, Function App and Event Grid.
- Basics of using Python and Python virtual environments.
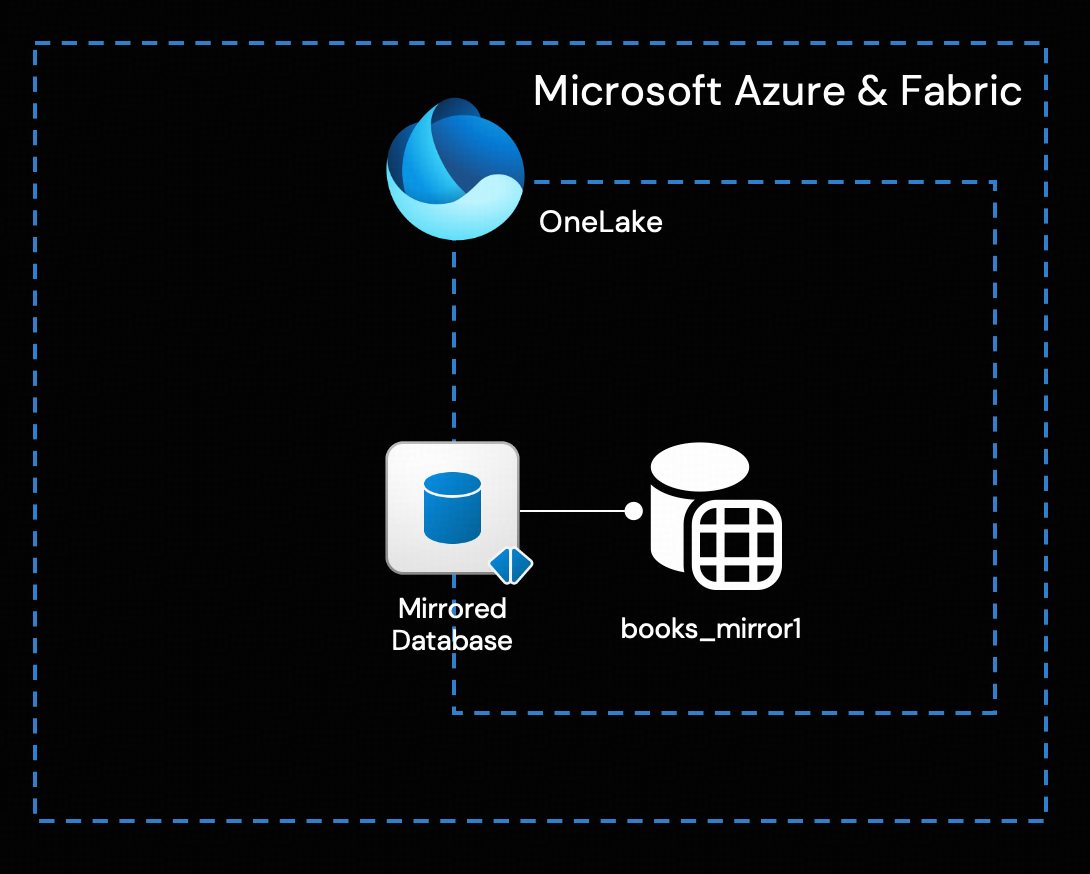
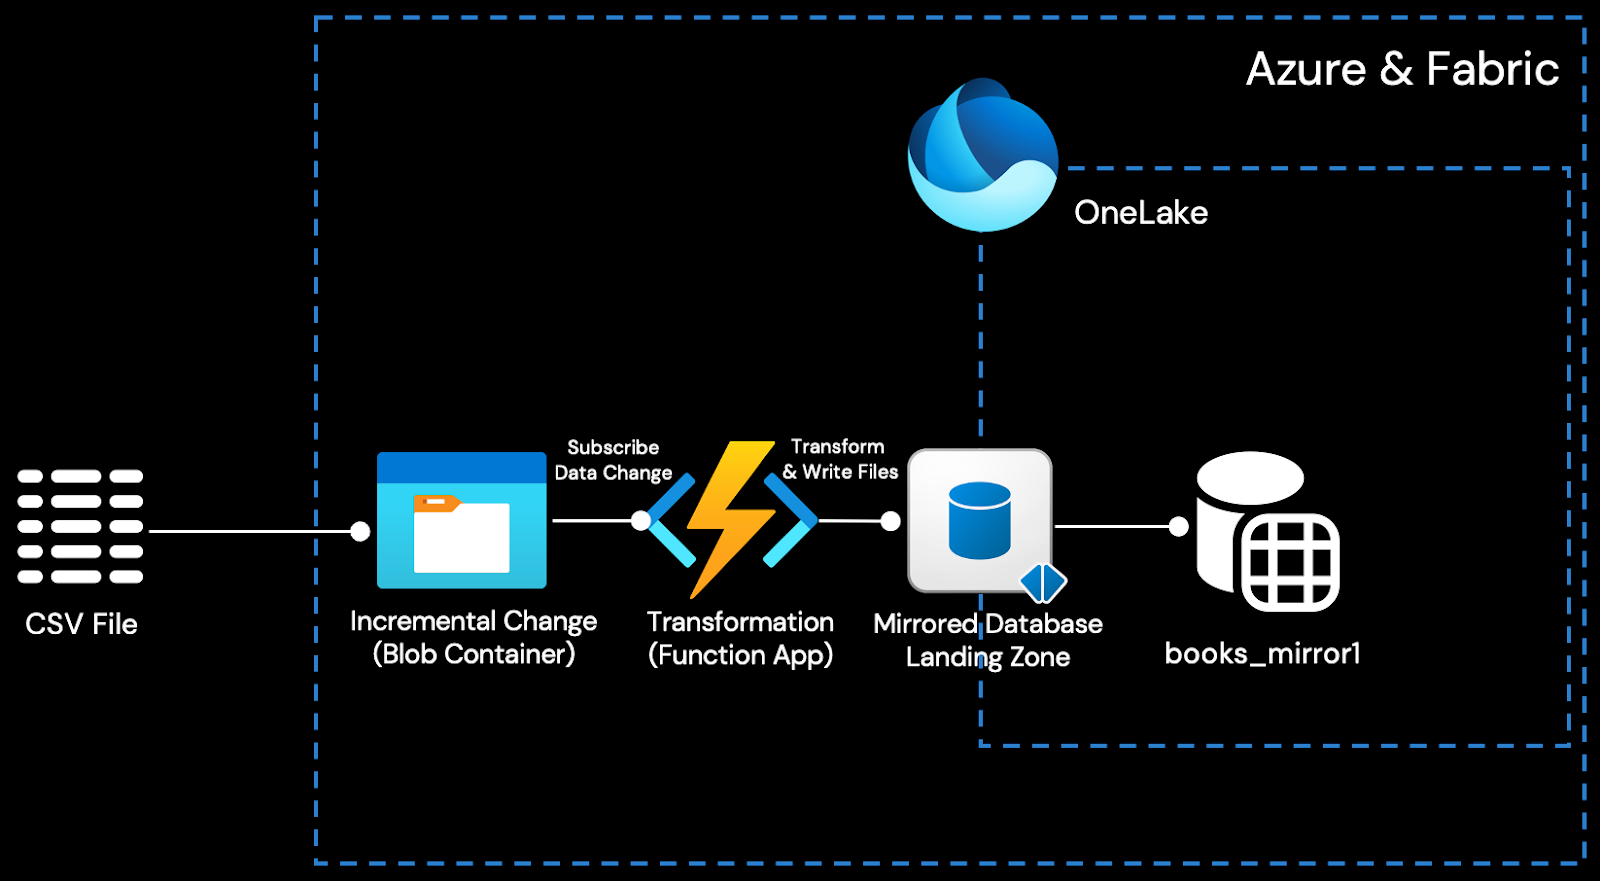
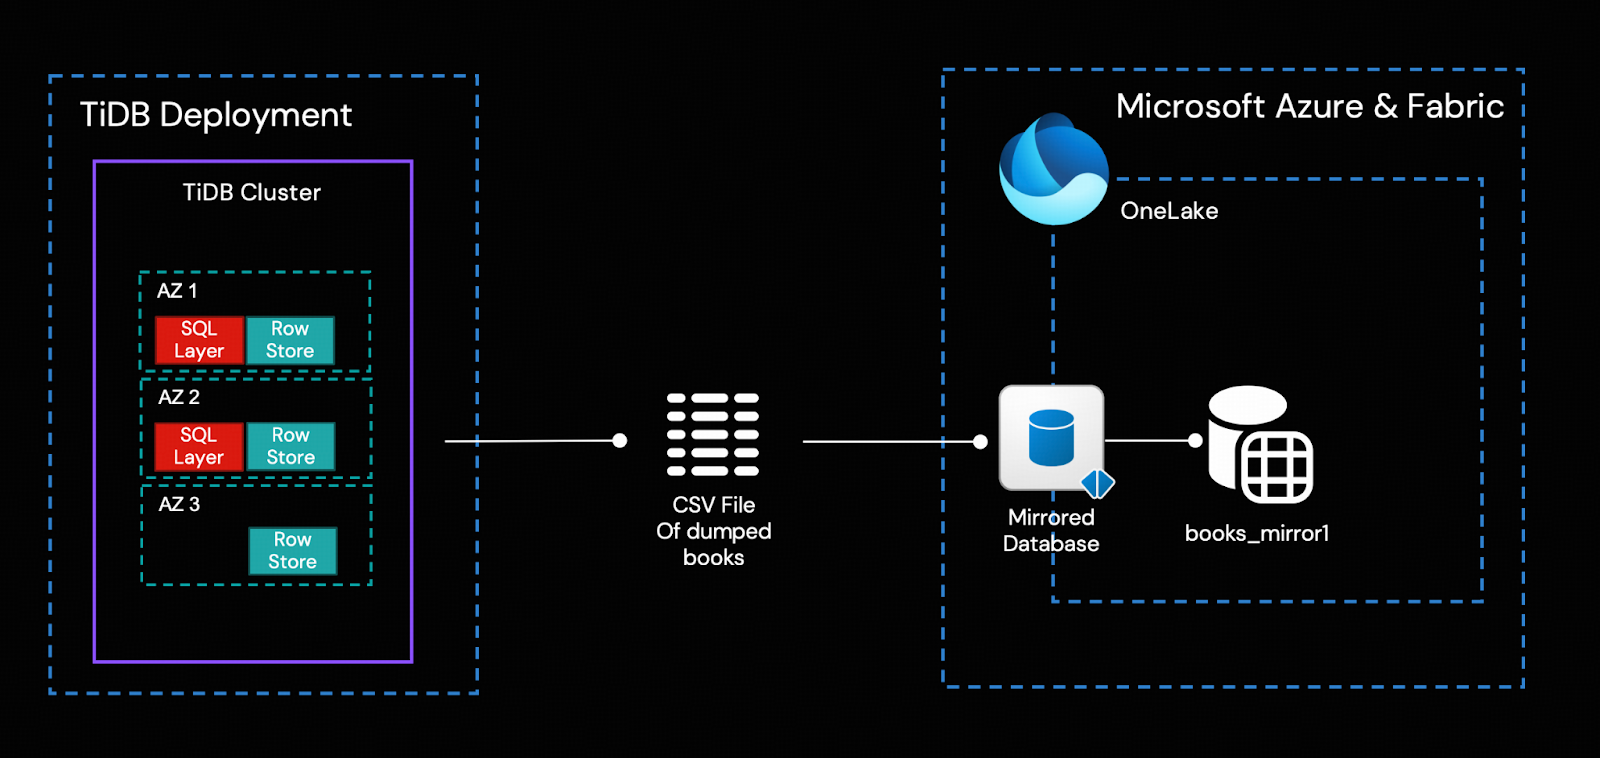
Architecture Overview
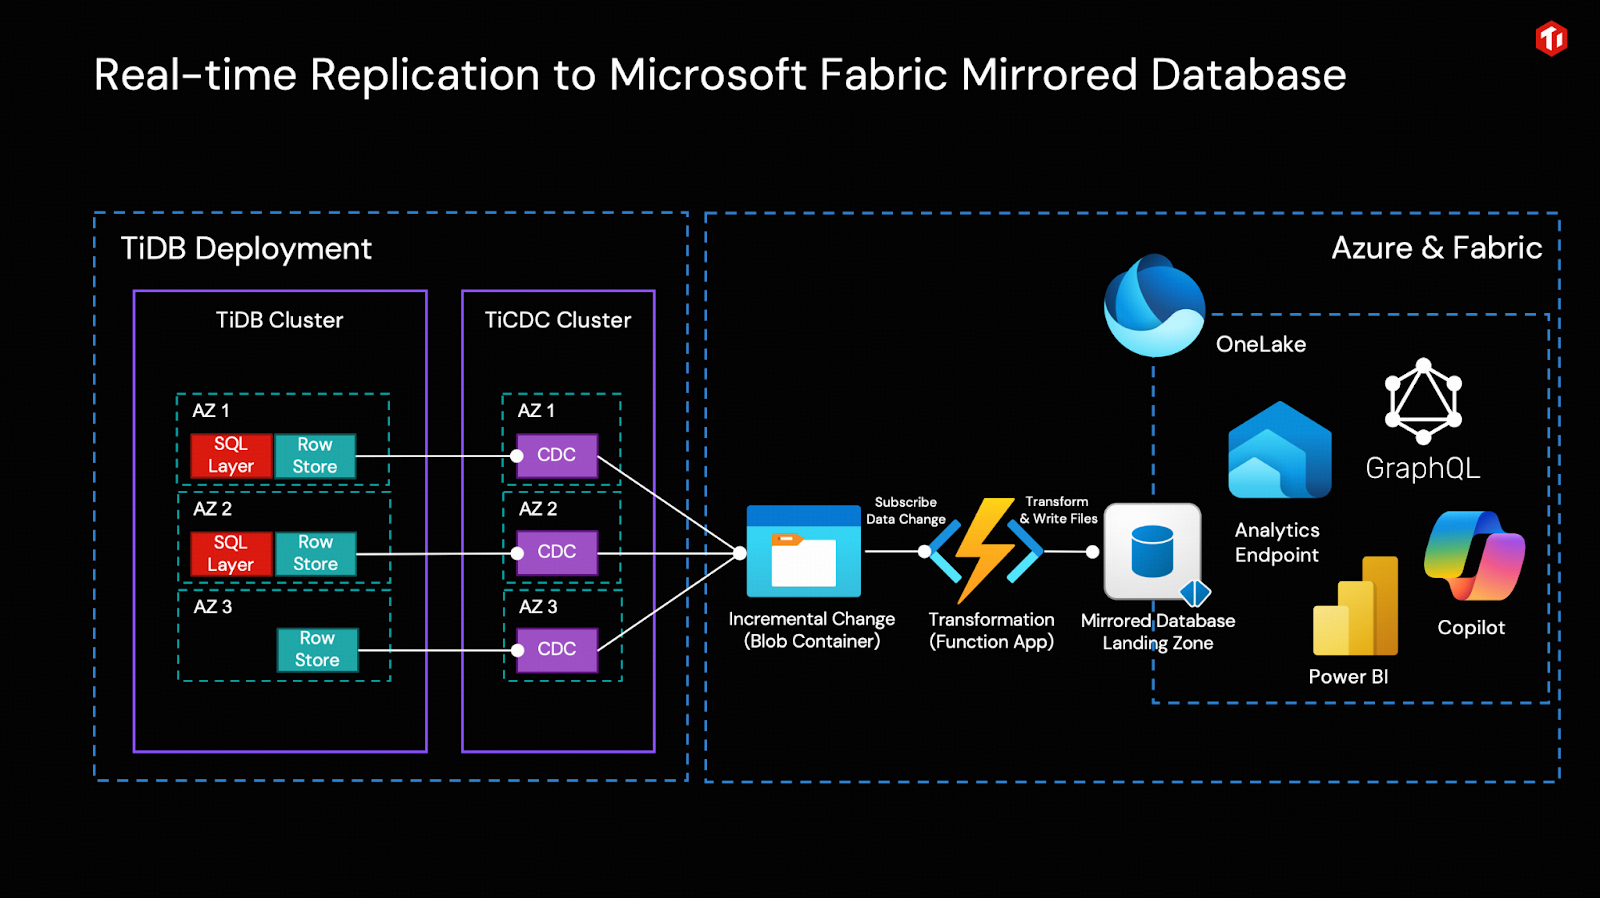
Simply put, the TiCDC cluster captures incremental data changes generated by the TiDB cluster in real time as CSV files and writes them into Azure Object Storage (Blob). By having Azure Function App subscribe to the change events from Blob via Event Grid, it can invoke the open Mirroring APIs to write incremental data into the Fabric Mirrored Database in real time and integrate it into OneLake.
In this way, the only transform is performed by Azure Function to convert the changes from TiCDC output to OneLake ingestion format, in real-time. Fabric’s built-in tools for business intelligence, artificial intelligence, and data science can then be used directly.
To understand the solution’s architecture, this section provides a high-level overview of its key components. When you’re ready to build it, follow the detailed, step-by-step instructions in the section “A Step-by-Step Example to Table Replication: From TiDB to Microsoft Fabric.”
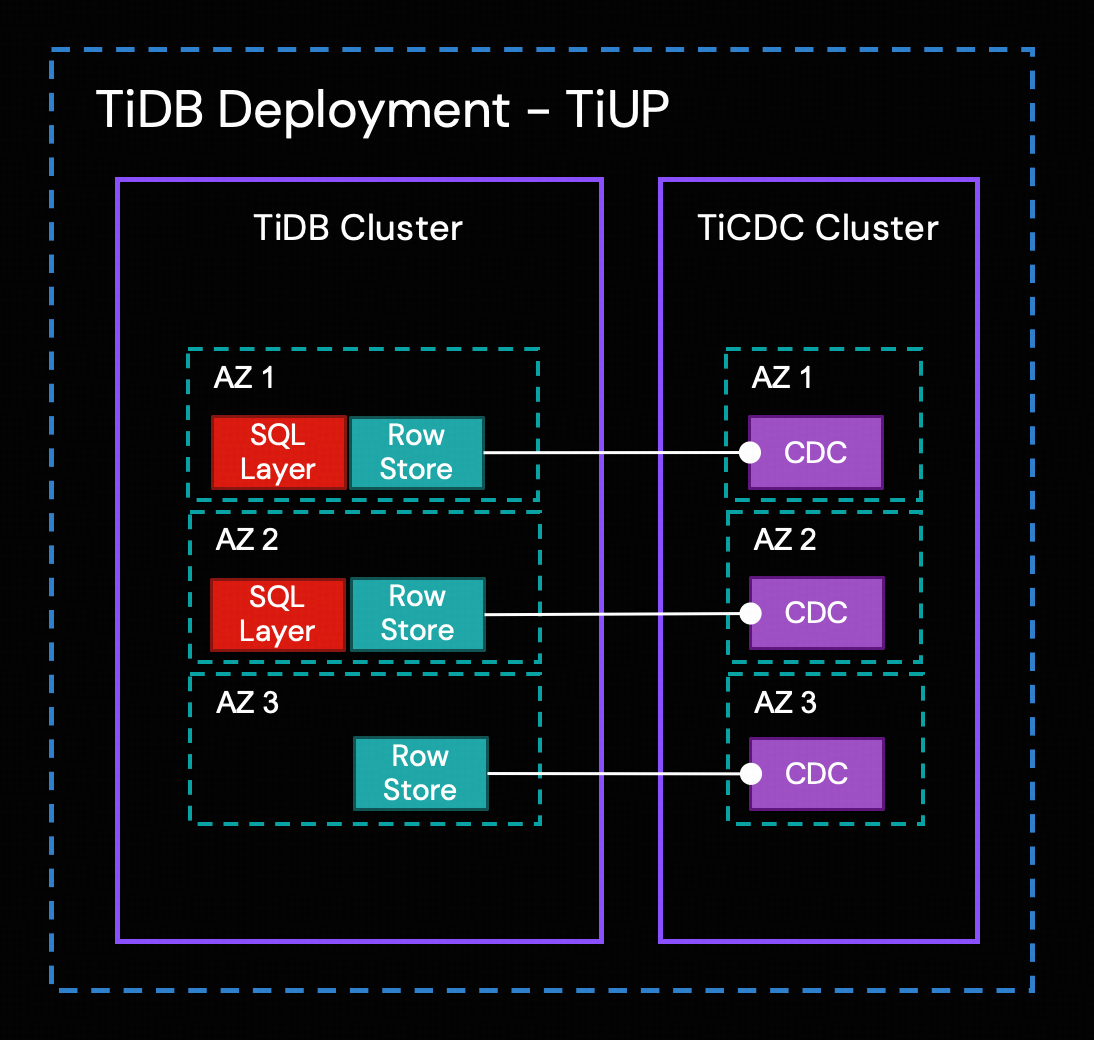
TiCDC Cluster
TiCDC is a tool used to capture transactional incremental data from TiDB, sort the captured data, and export row-based incremental data to downstream sinks. Similar to TiDB, the TiCDC cluster supports high-availability deployment. Multi-node, cross-AZ topologies are common in production environments.
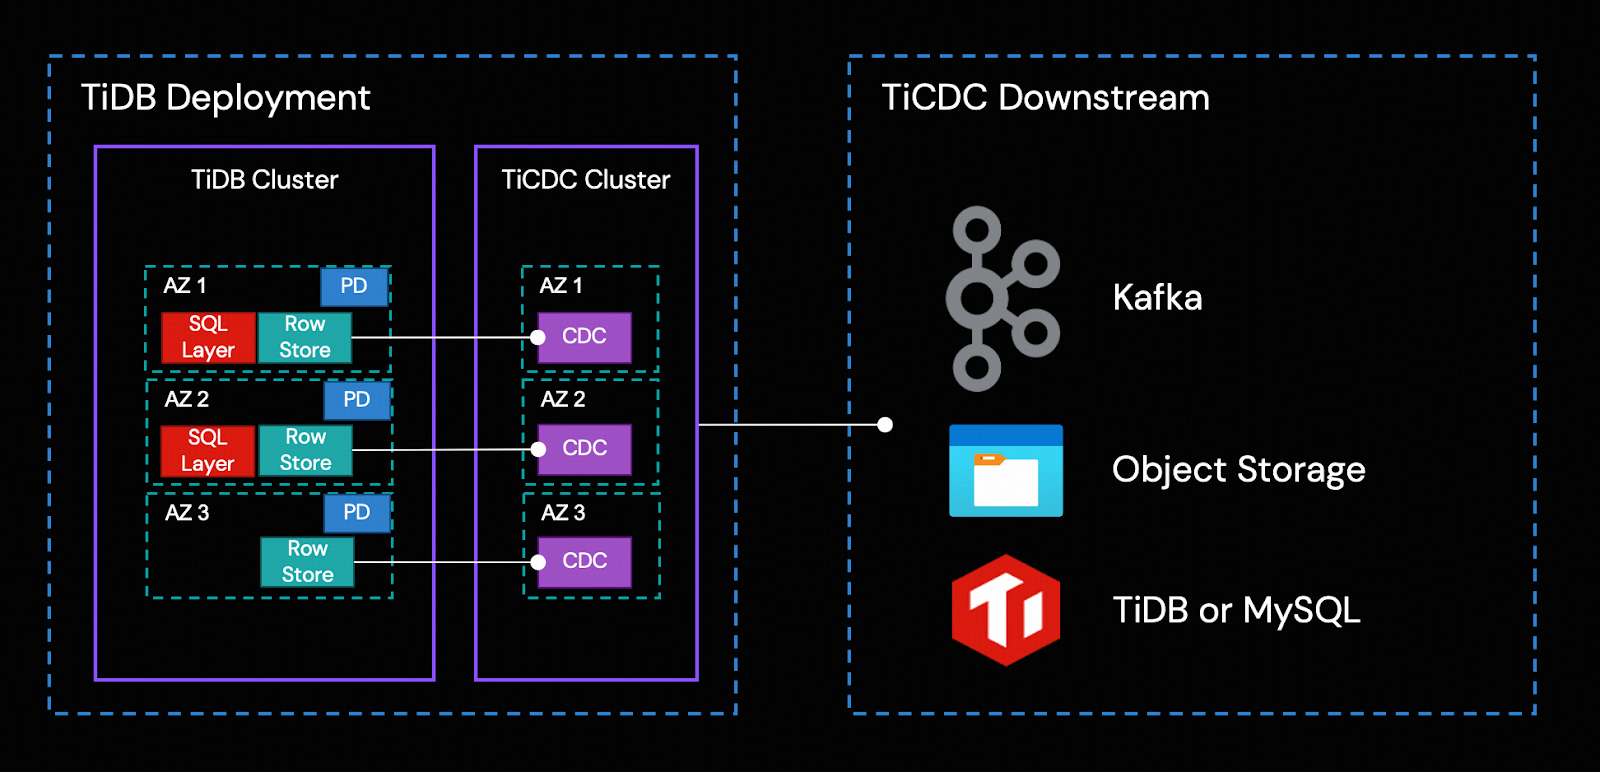
TiCDC’s HA is achieved through TiDB’s Placement Driver (PD). The replication process consists of the following steps:
- Multiple TiCDC processes pull data changes from Row Storage nodes.
- TiCDC sorts and merges the data changes.
- TiCDC replicates the data changes to downstream systems through replication tasks (changefeeds).
For all captured changes, TiCDC outputs them at least once. When the TiDB row storage or TiCDC cluster encounters a failure, TiCDC might send the same incremental change repeatedly.
Azure Blob Container object storage is the TiCDC downstream for the integration solution.
Azure Blob Container, Function App, and Event Grid
The arrival of changed data in the Blob container triggers an Azure Function App via Event Grid. Within the function, the following two key tasks are executed:
- Transforms the TiCDC event payload into the acceptable format specified by the OneLake mirrored database.
- Ingest the transformed change data into the Landing Zone of the mirrored database.
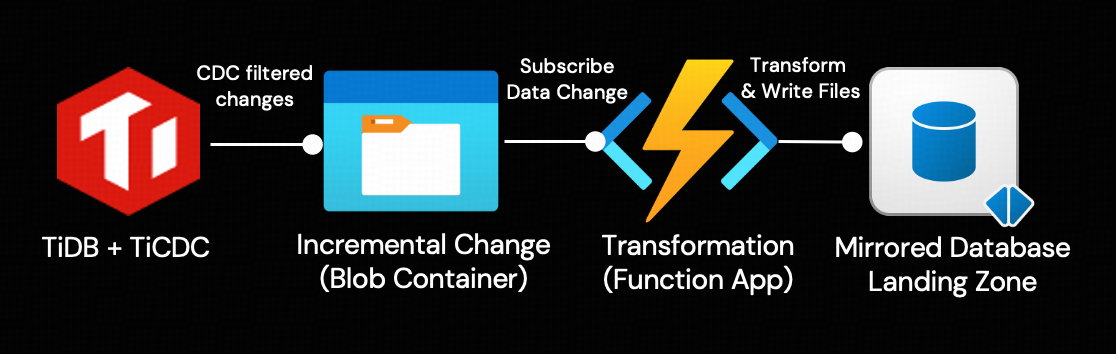
Landing Zone for the Mirrored Database
For every mirrored database, there’s a unique storage location in OneLake for metadata and delta tables. Open mirroring provides a landing zone folder for the Function app to create a metadata file and push incremental data into OneLake. Mirroring monitors these files in the landing zone and reads the folder for new tables and data added.
Once the data lands in the Mirrored Database, open mirroring simplifies the handling of complex data changes, ensuring that all mirrored data is continuously up-to-date and ready for analysis.
To streamline your workflow with Mirrored Database Landing Zones, our solution offers Python utilities that manage all necessary Fabric mirroring API interactions, ensuring compliance with Landing Zone requirements and file formats.
Python Utilities
To simplify the open-source integration, we provide two helper Python scripts:
- Admin tool template: Designed for replication administrators, this tool offers a high-level API interface for managing tables within the mirrored database. We have adapted the original Microsoft version to ensure compatibility with TiCDC’s CSV file format.
- Azure function template: This is a semi-complete core script for the Azure Function App, provided as a starter template. You can directly incorporate it into your own Azure Function and customize it to work with your specific business logic.
Detailed usage instructions for both of these tools will be provided in the step-by-step guide below.
A Step-by-Step Example to Table Replication: From TiDB to Microsoft Fabric
Note
- For this demonstration, to ensure a clean separation from your existing environment, we will create a new resource group and storage account dedicated to this example workload. While not the only method, this is the simplest way to enforce permission separation.
- The TiDB version we use in this detailed example is TiDB 8.5.1.
Step 1. Create a Mirrored Database in Microsoft Fabric
The Mirrored Database in Microsoft Fabric can either be created using a publicly available Rest API or through the Microsoft Fabric portal. This blog guides you through the steps via Microsoft Fabric portal:
- Sign in to the Microsoft Fabric portal.
- Create a new workspace. In our example, the workspace name is integration-demo.
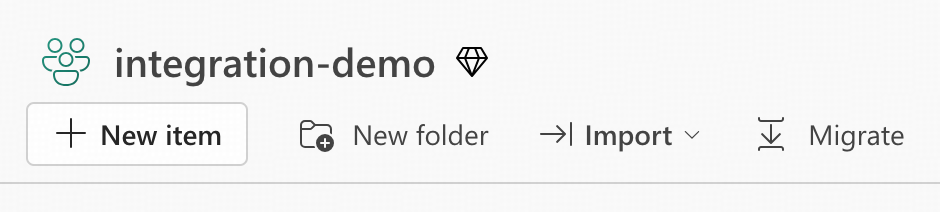
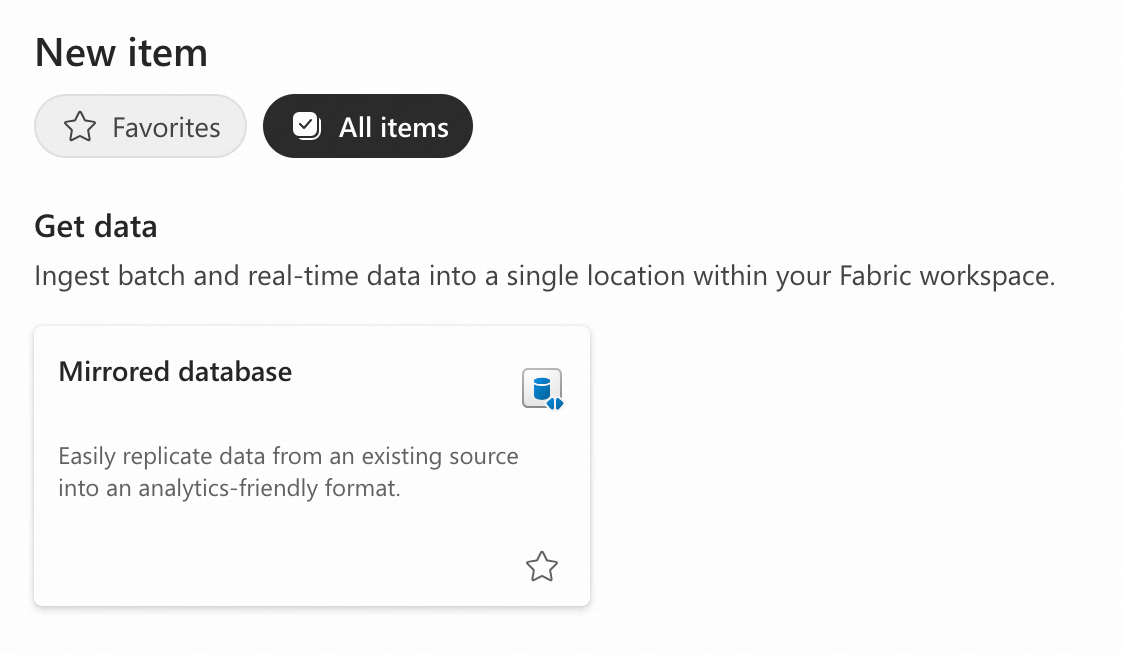
- In the workspace, click “+ New item”, choose the Mirrored database item.
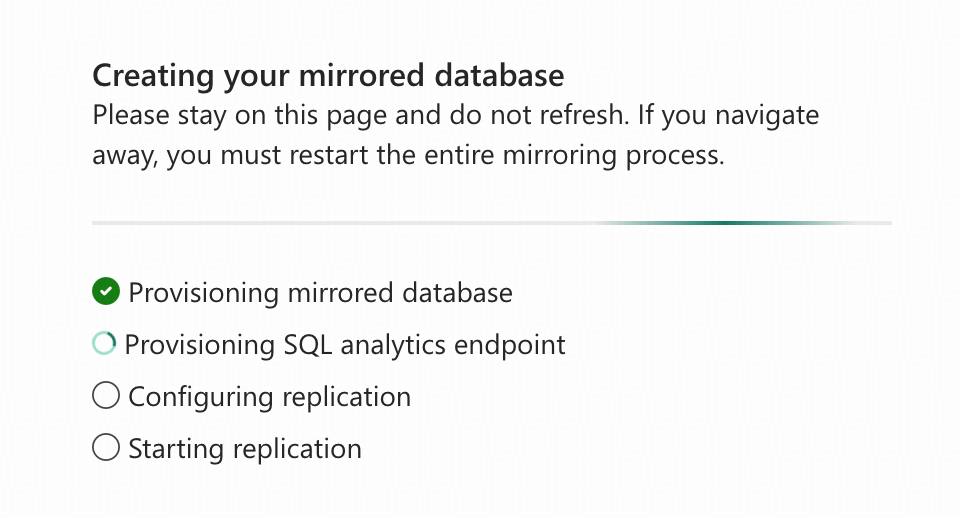
- Give it a name. In our example, the mirrored database name is bs_mirror1. Click “Create” and wait for the creation to complete, do not navigate away.
- After the Mirrored Database is created and replication automatically begins, you will see this interface. You should copy and save the Landing Zone URL for future use. For subsequent steps, we will use the placeholder <landing_zone_url> to represent the Landing Zone URL.
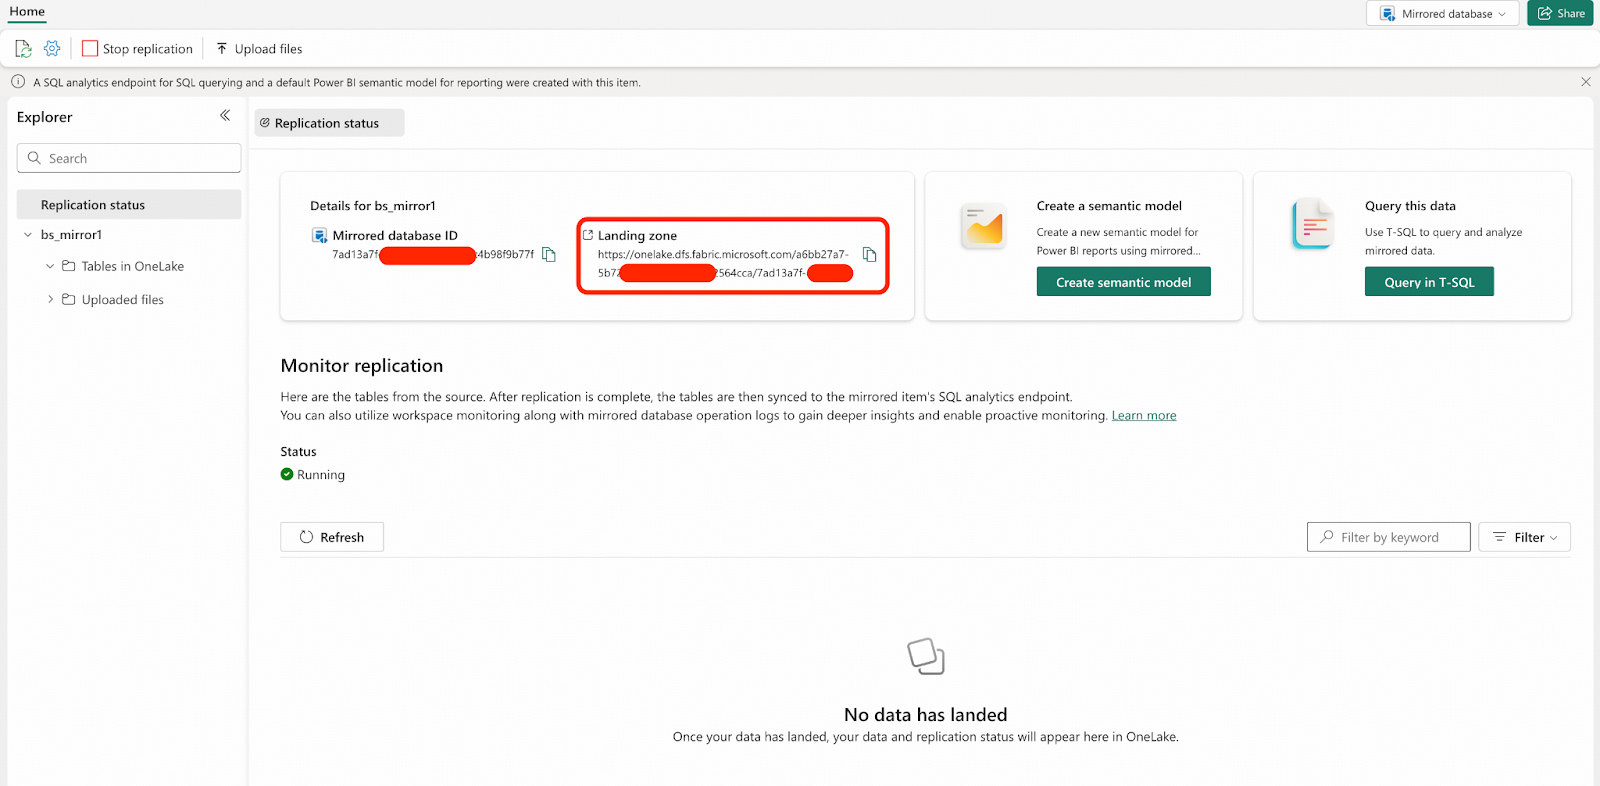
You have created an empty Mirrored Database in Microsoft Fabric, and by default, it has already started replication. Your database will wait for the data files to be ingested into the Landing Zone.
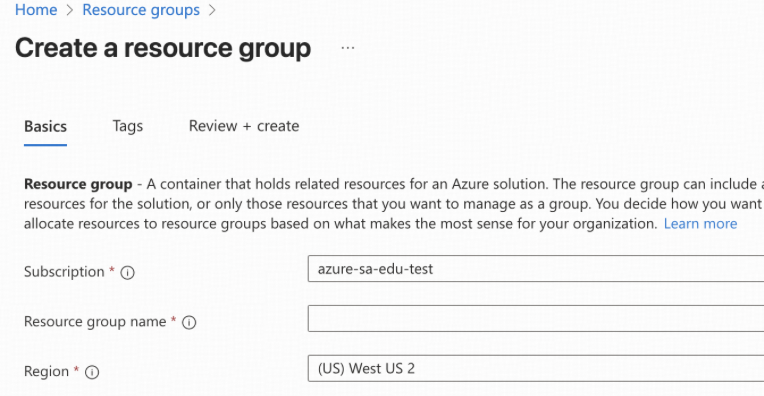
Step 2. Create a Dedicated Azure Resource Group for the Example Replication Workload
This step is optional but recommended. As we will create multiple Azure resources, placing them in a single resource group will simplify IAM (Identity and Access Management) permission control. This approach adheres to security best practices by isolating the example workload’s access from your existing environment.
- Sign in to the Microsoft Azure Portal.
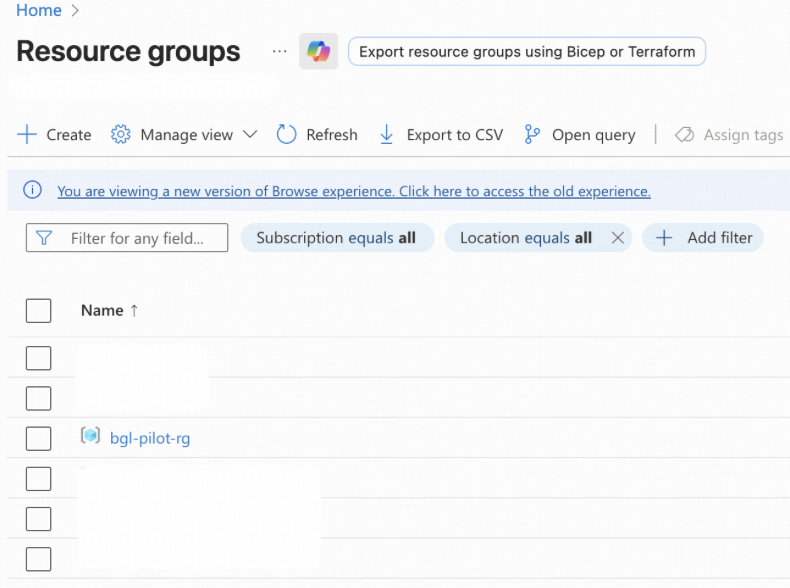
- Navigate to Resource groups. Create a new resource group named bgl-pilot-rg. You also need to assign Subscription and Region to the resource group. In our example, the TiDB cluster is deployed in Oregon US, so we’ll choose (US) West US 2 when possible for every new resource we create along the way
- All new Azure resources created in other steps will be placed into the resource group bgl-pilot-rg.
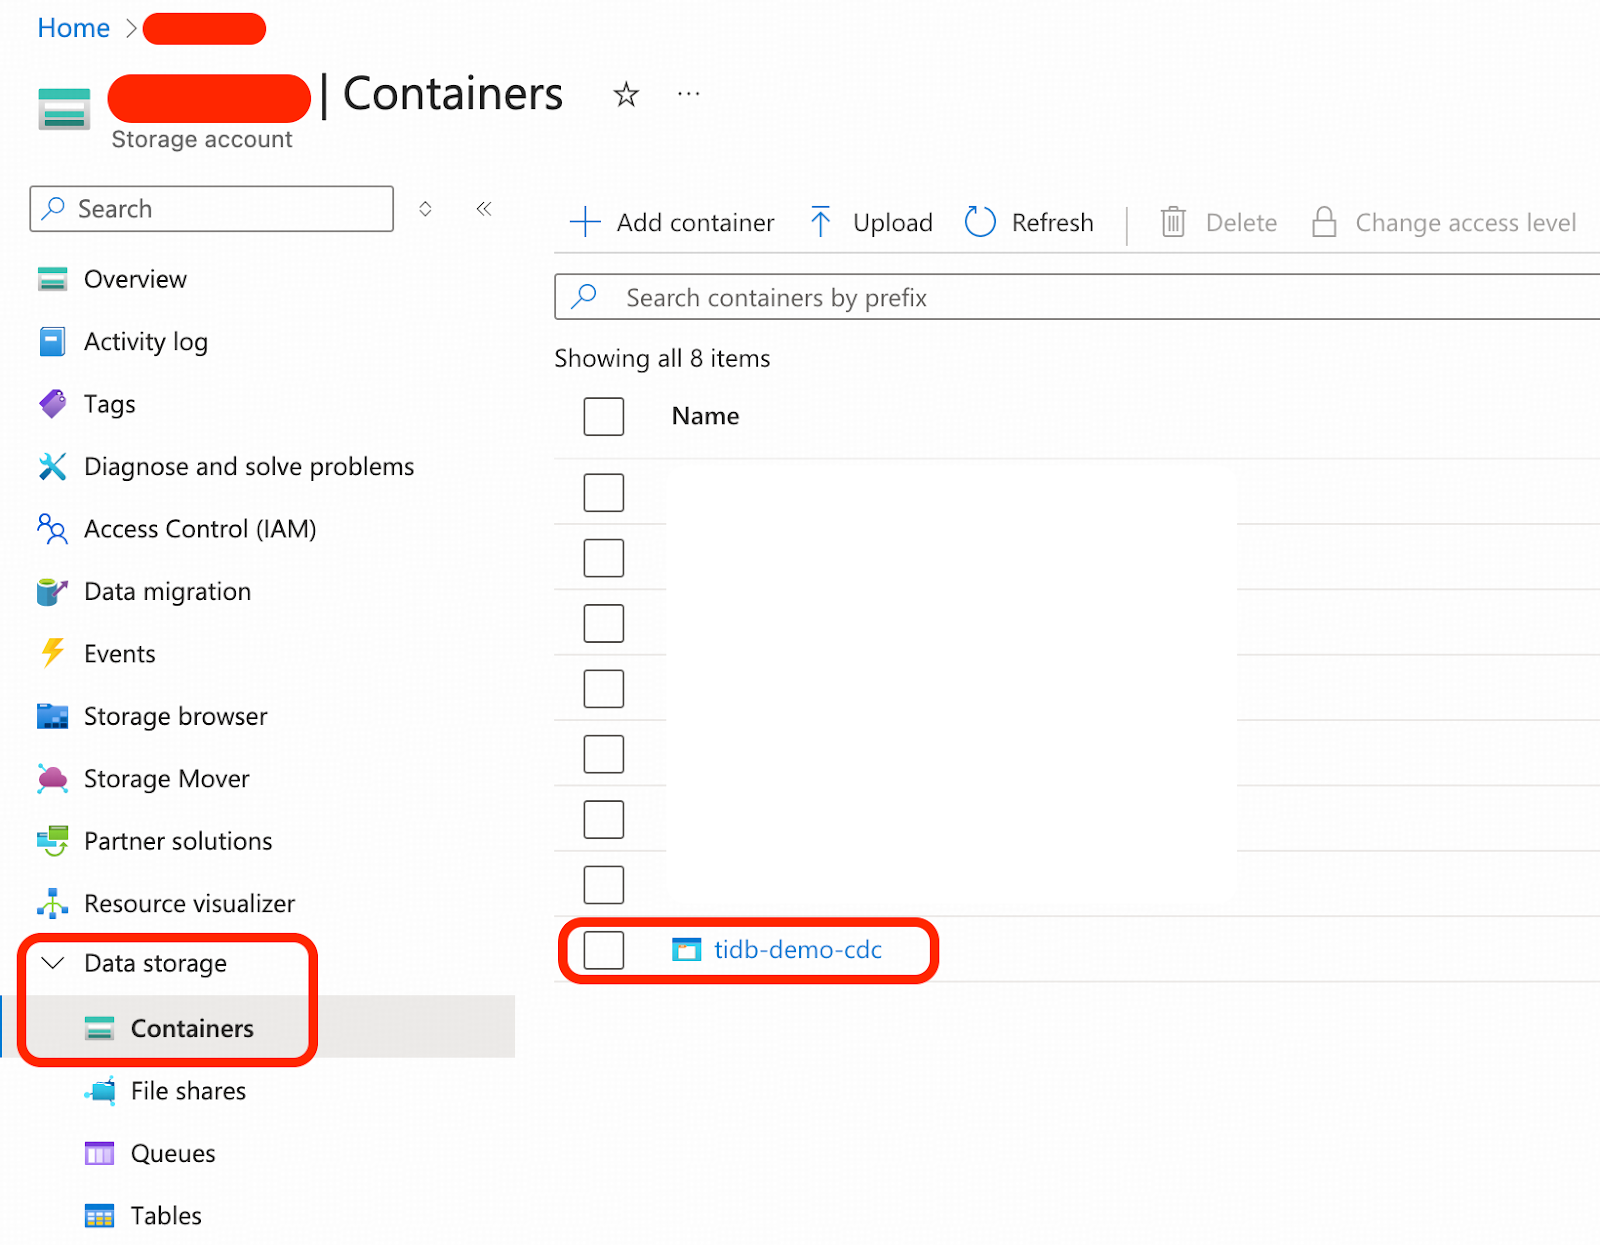
Step 3. Create a New Storage Account and a Blob Container for TiCDC Sink Destination
TiCDC replicates change data by capturing it from TiDB’s row storage and feeding it in real-time to an Azure Blob Storage container. This blob container functions as an intermediate staging area, caching the incremental transactional data for further processing.
- Sign in to the Microsoft Azure Portal.
- Navigate to Storage accounts. You need to create a storage account and put it into resource group bgl-pilot-rg. Note your storage account name. For subsequent steps, we will use the placeholder <storage_account_name> to represent the name of your storage account.
- In your storage account, create a new blob container named tidb-demo-cdc for our example.
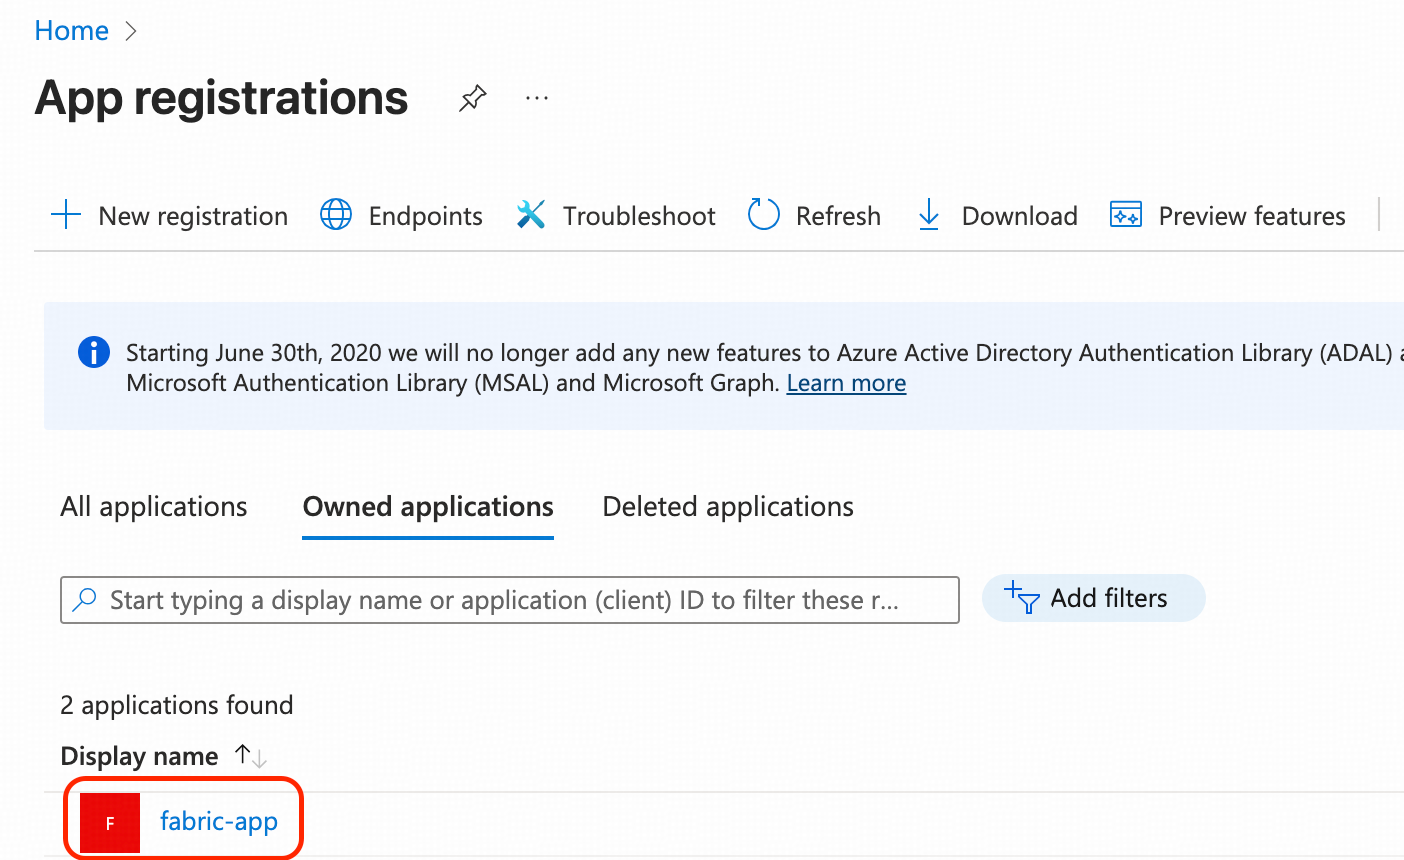
Step 4. Prepare Microsoft Entra ID for the Replication Workload
The replication workload needs access permissions to Azure Data Lake and other required resources in Azure. In this step, we will first create a Registered App for replication workload authentication.
- Sign in to the Microsoft Azure Portal.
- Navigate to App registrations. Click “+ New registration”, keep all the defaults, and click “Create”. In our case, it is named fabric-app.
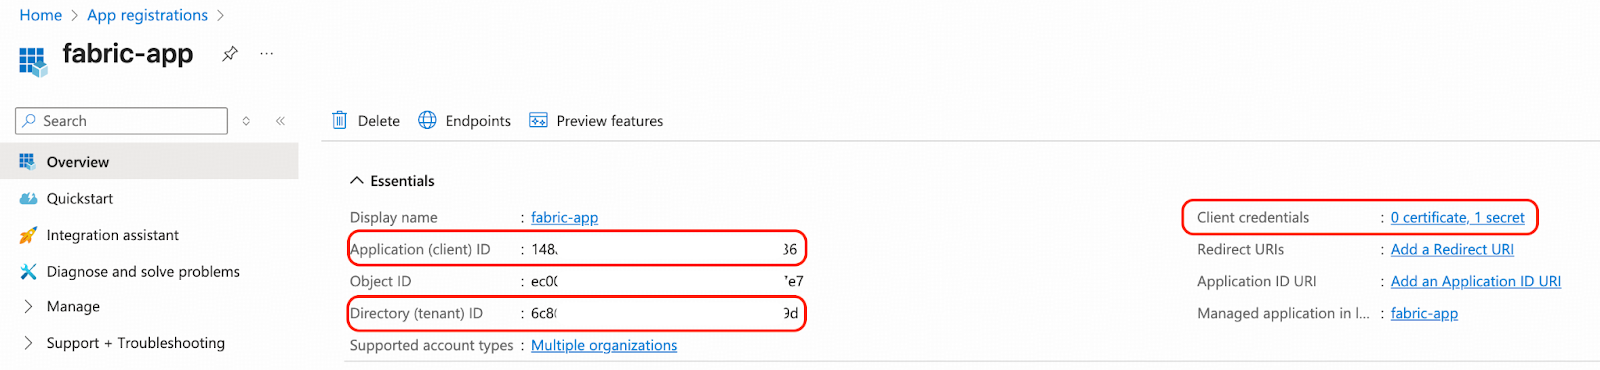
- Click on fabric-app and navigate to its Overview page. Then, complete the following three tasks:
- Note down the Application (client) ID. We will refer to this as <fabric_app_client_id> in subsequent steps.
- Note down the Directory (tenant) ID. We will refer to this as <fabric_app_client_tenant> in subsequent steps.
- Generate a client secret for Client credentials and note down the secret value. We will refer to this as <fabric_app_client_secret> in subsequent steps.
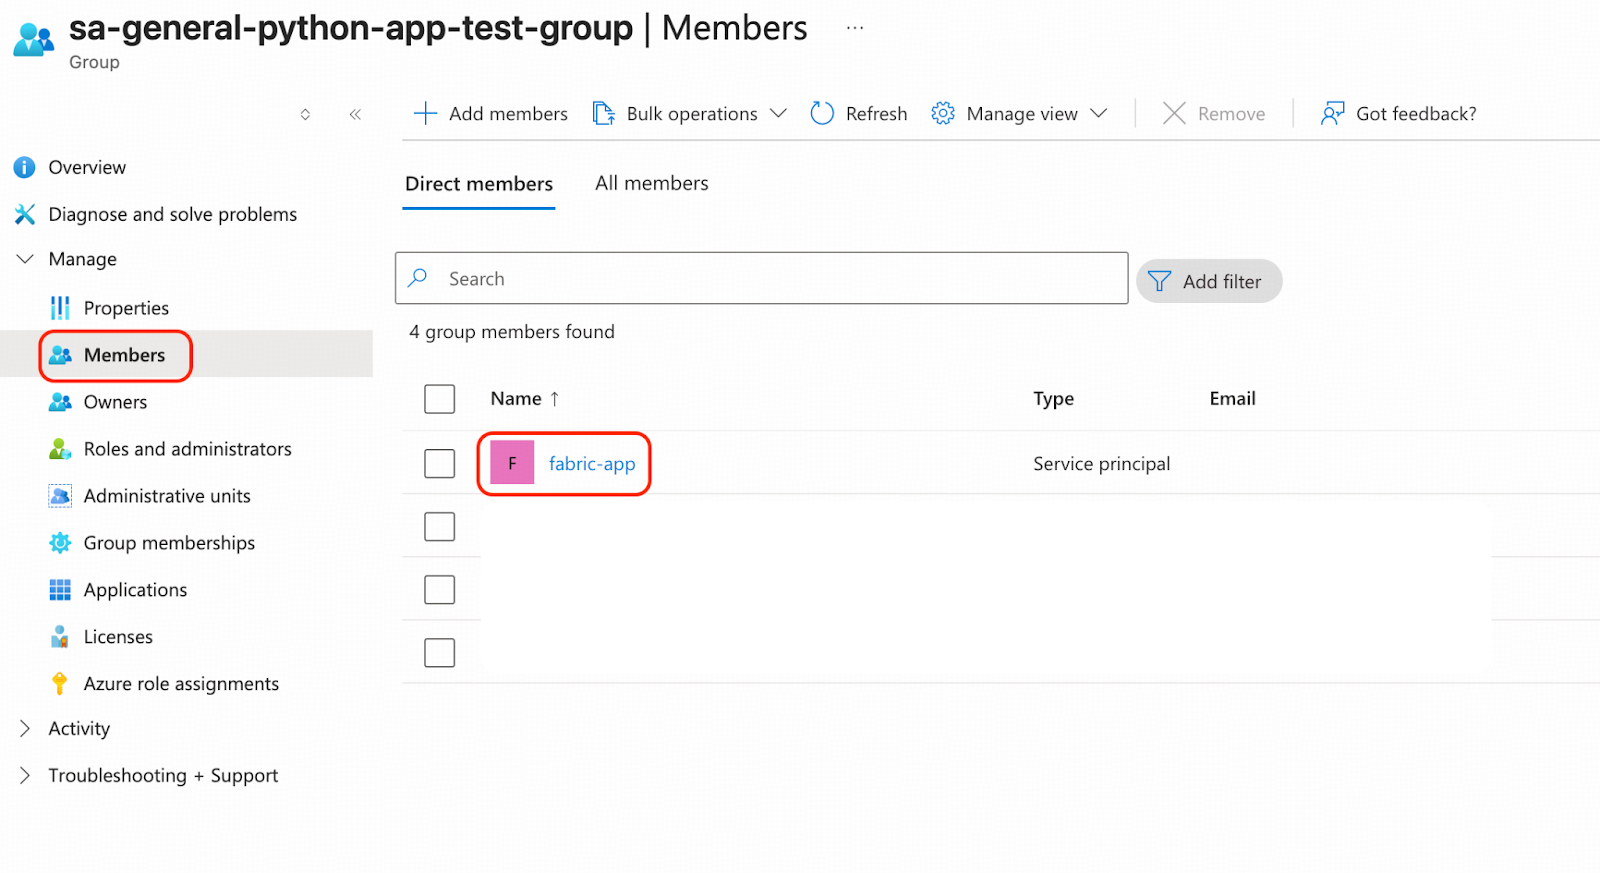
Add the registered App fabric-app to an Entra ID group. In our case the group name is sa-general-python-app-test-group.
- Navigate to Microsoft Entra ID.
- Create a group, and assign fabric-app as its member.
Grant required permissions to fabric-app for replication workload authorization.
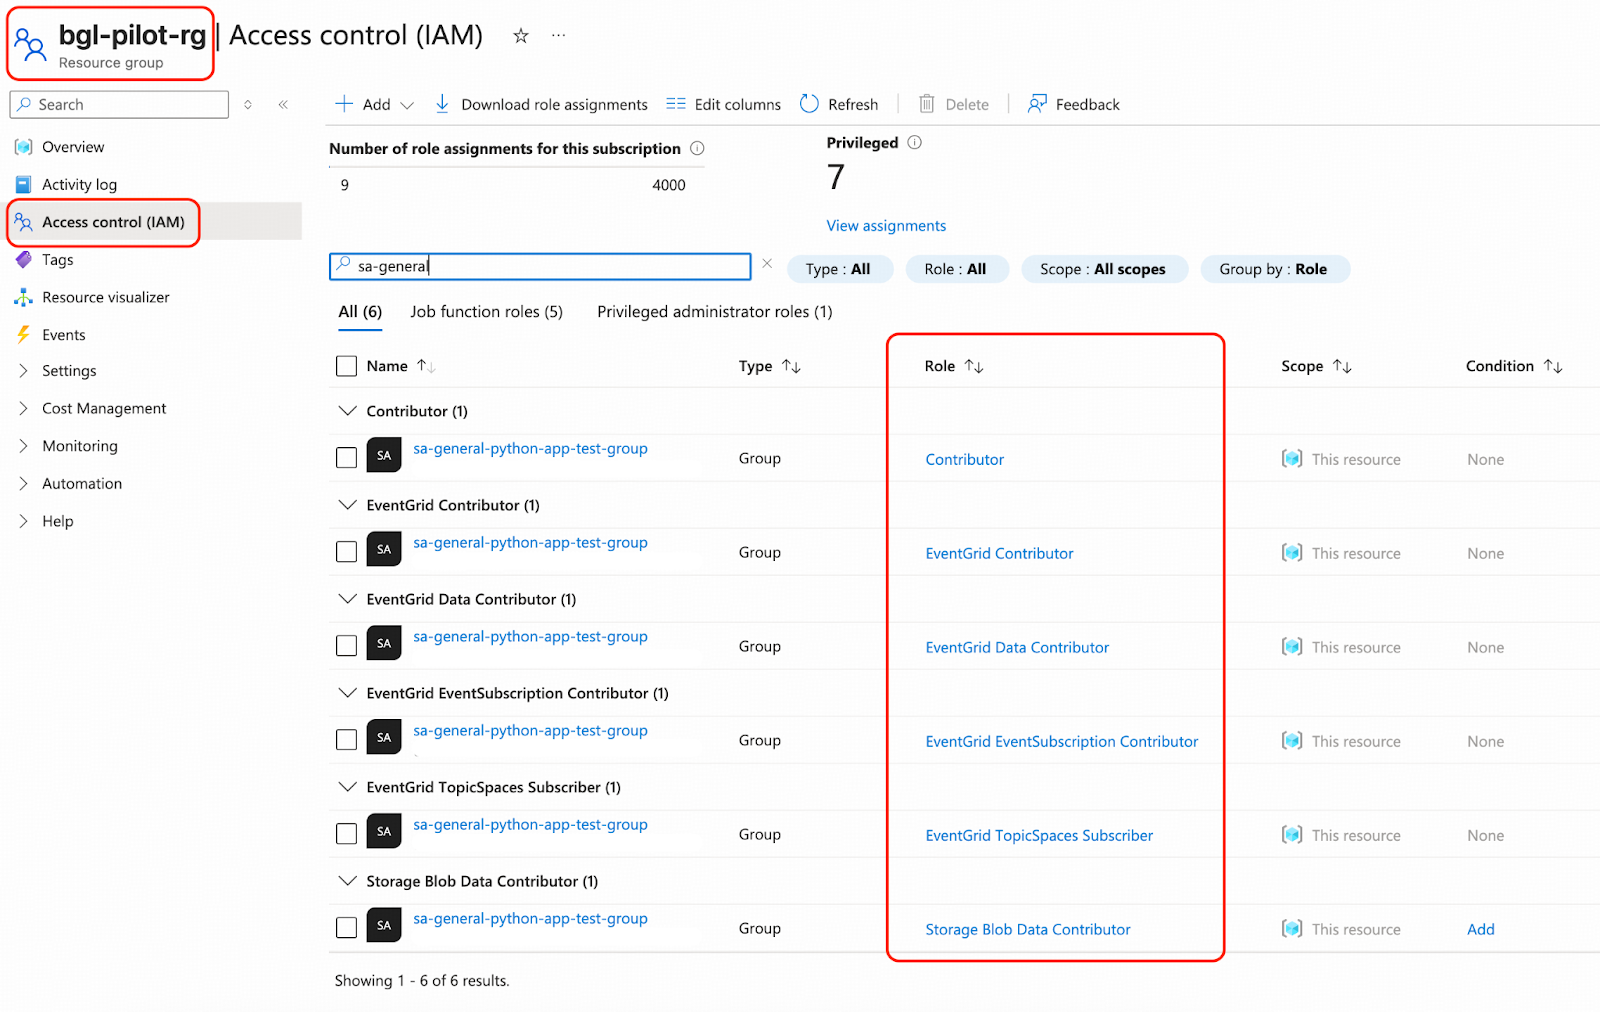
- Grant permissions to sa-general-python-app-test-group from Azure portal. Navigate to Resource groups, click bgl-pilot-rg, click Access control (IAM), click “+ Add” and then Add role assignment. The following roles are recommended:
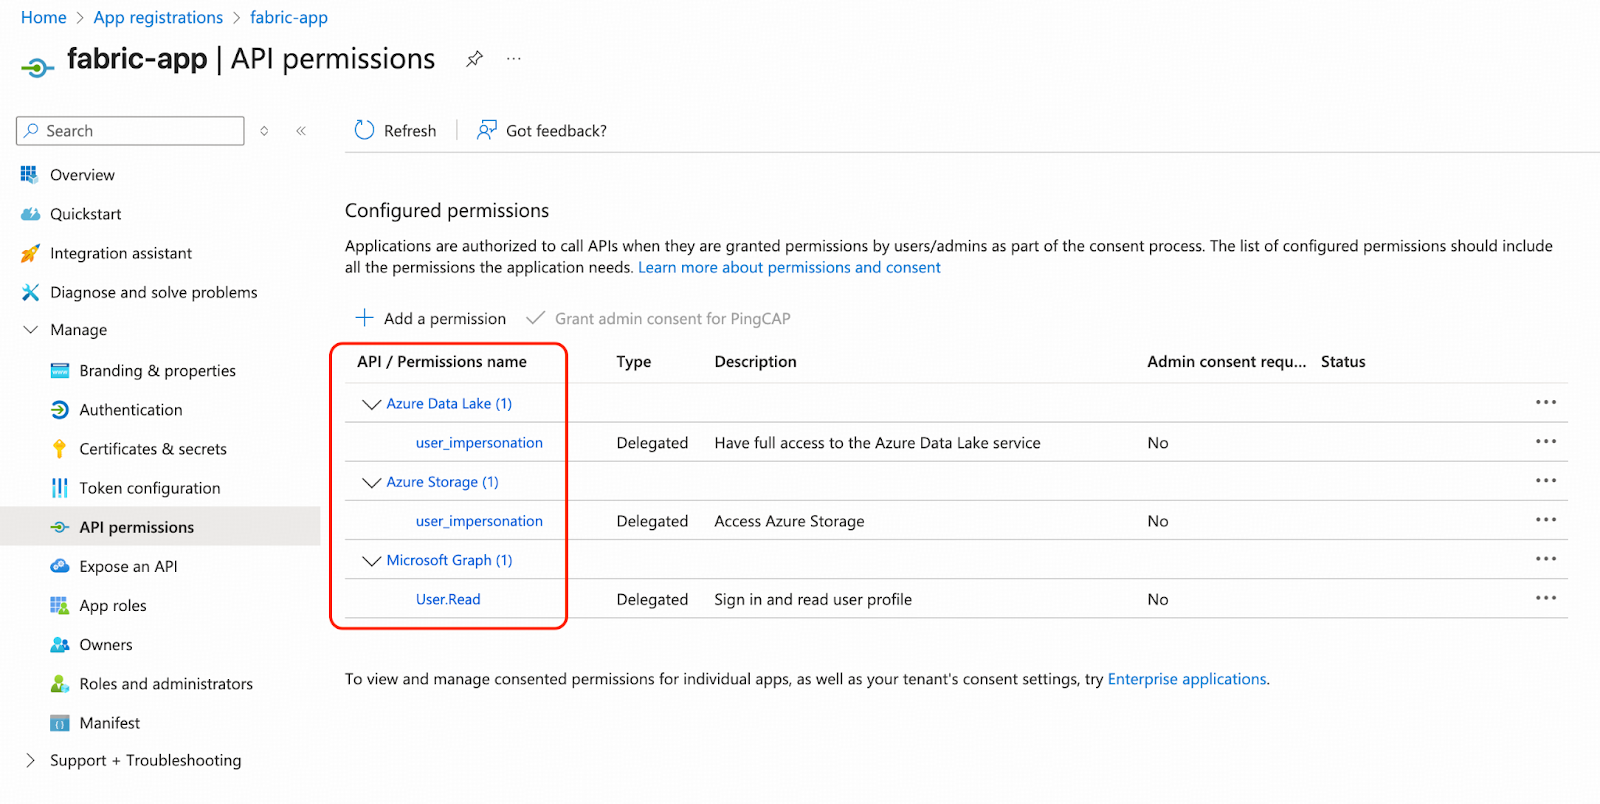
- Grant permissions to fabric-app from Azure portal. Navigate to App registrations and click fabric-app under API permissions. The following permissions are recommended:
- Next, sign in to the Microsoft Fabric portal.
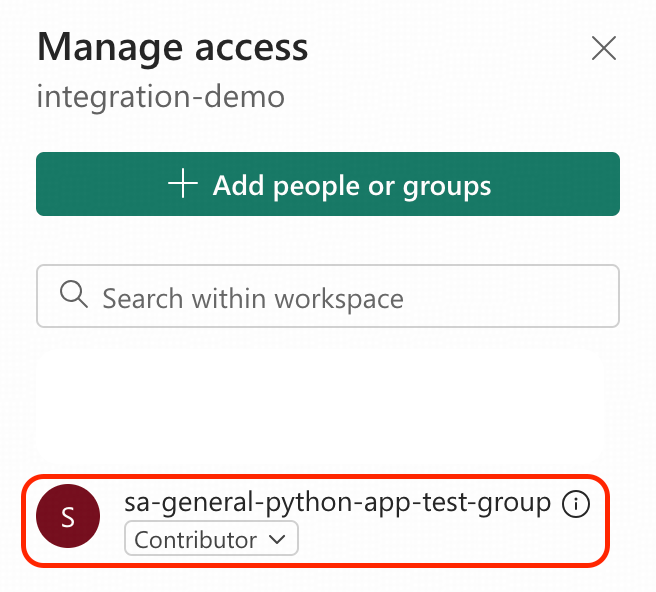
- Navigate to workspace integration-demo, and click Manage access.

- Grant the Contributor permission to sa-general-python-app-test-group.
Step 5. Create a Table in Mirrored Database
In our example, we will replicate a book table in real-time from TiDB to Fabric OneLake.
We need to create a mirrored delta table in the mirrored database. The following tasks are recommended to be executed in a Python virtual environment with Python 3.11.
- Download the Python admin tool template, which provides a high-level API for managing mirrored databases. In this walkthrough, we download the solution version of the Admin Tool Template, which includes pre-defined metadata for the books table.
wget https://raw.githubusercontent.com/pingcap-inc/tidb-course-labs/refs/heads/main/solution/microsoft-fabric-mirrored-database/openmirroring_admin_solution.py

wget https://raw.githubusercontent.com/pingcap-inc/tidb-course-labs/refs/heads/main/solution/microsoft-fabric-mirrored-database/requirements.txt- Modify the Python script openmirroring_admin_solution.py around line# 430, replace the following placeholders with the actual values you copied from Step 1 and Step 4.

- Install the dependencies in your Python virtual environment.
pip install -r requirements.txt - Create an empty table books_mirror1 in the mirrored database.
python openmirroring_admin_solution.py --create-table --table-name books_mirror1 - Sign in to Microsoft Fabric portal.
- Navigate to the integration-demo workspace, open the bs_mirror1 mirrored database, and expand the “Uploaded files” section. Verify that a _metadata.json file is present. OneLake will use this metadata to create a delta table asynchronously.
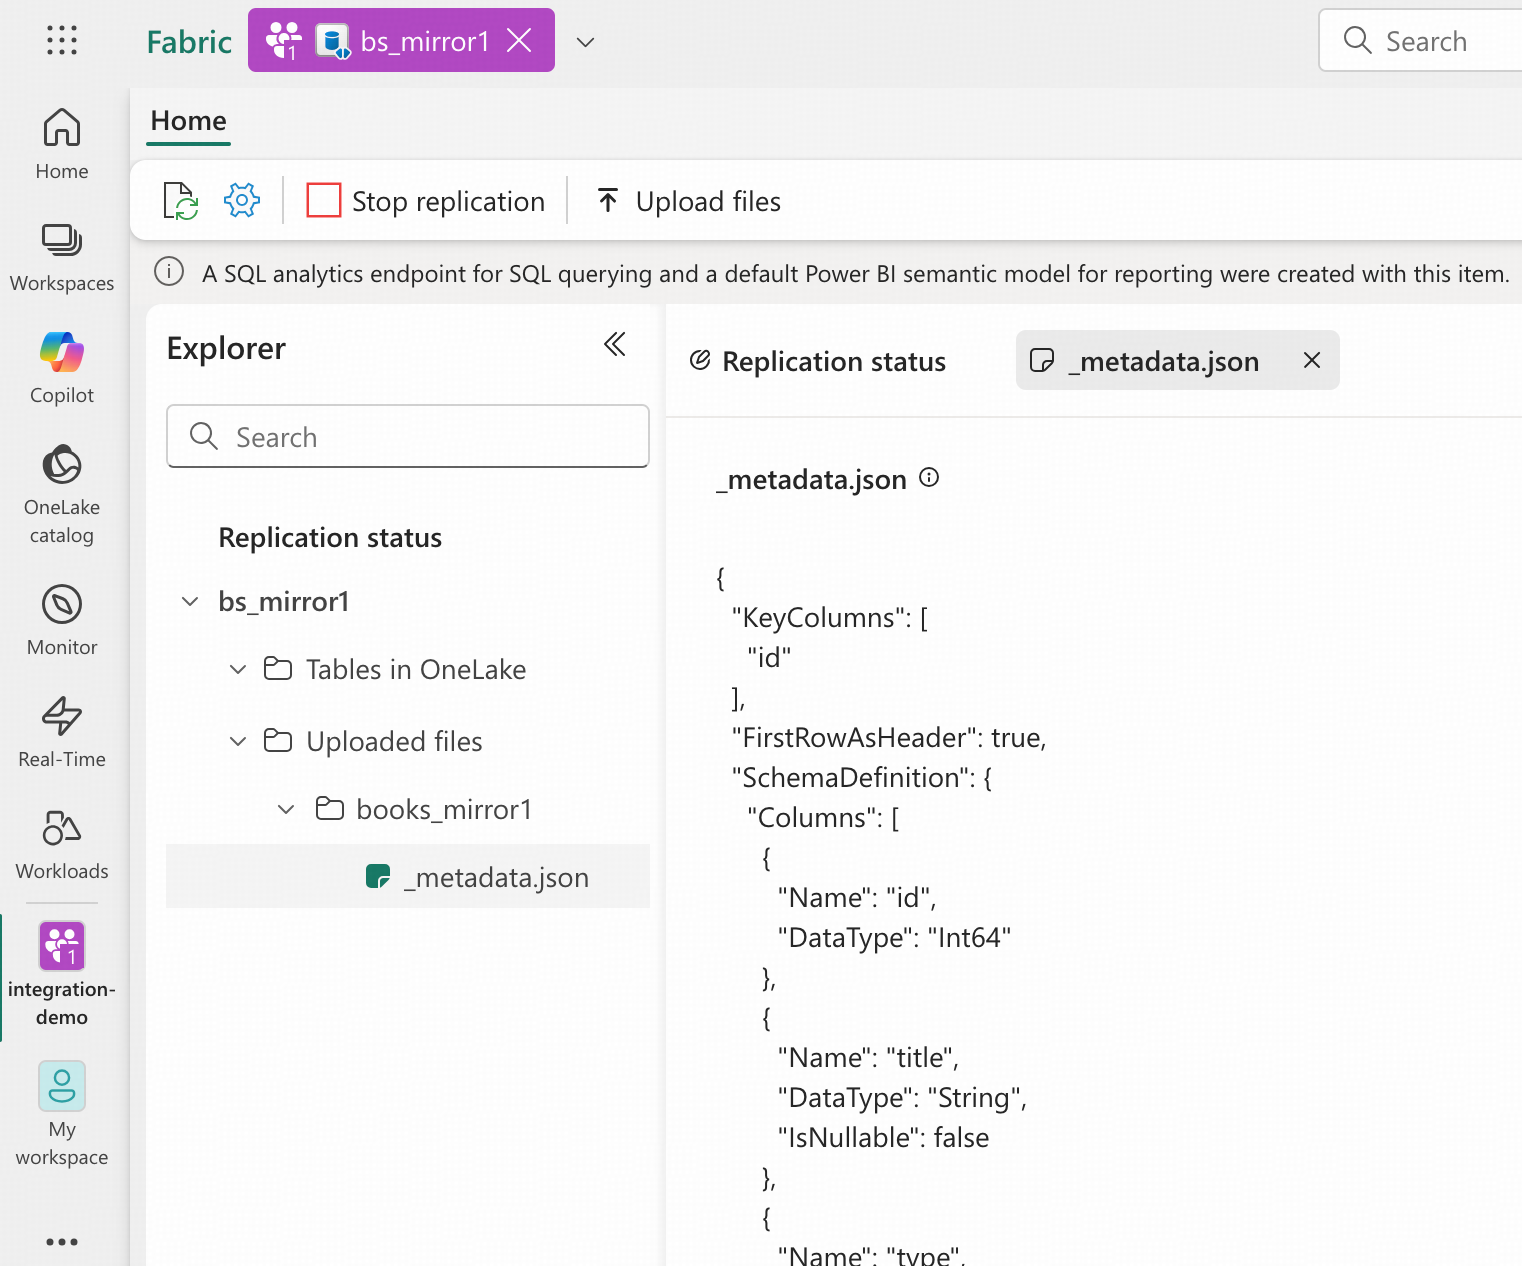
Now that the books table definition is in place as books_mirror1 within the mirrored database, any data with anticipated structure uploaded to the Landing Zone will be automatically imported into OneLake. The table definition is defined by variable target_table_metadata in openmirroring_admin_solution.py. In a real world scenario you can add your own metadata like so or externalize them at your will.
Step 6. Deploy an Event Trigger as the Changefeed Listener
In this step, we will establish the Changefeed listener between the Blob container tidb-demo-cdc and the Mirrored Database bs_mirror1 Landing Zone. It is achieved by implementing an Azure Function App deployed on the top of Azure Event Grid.
Follow this tutorial to develop and deploy the event-driven Azure Function App while keeping the following information in mind:
- The Azure Function App name should be table-books-cdc-trigger.
- The Blob container path is tidb-demo-cdc.
- Create all resources under the resource group bgl-pilot-rg.
- TiCDC uploads change data as CSV files. When configuring the trigger, ensure its filtering rule targets files with the .csv extension. For our example, the full path for the uploaded change data blob will be tidb-demo-cdc/<tidb-cluster-name>/bookshop/books/<start-tso-sequence>/<yyyy-mm-dd>/CDCnnnnnnnnnnnnnnnnnnnn.csv.
- In the Python script function_app.py, the function name for the trigger should be event_grid_blob_trigger. For example, you will see the following view in your VS Code editor:

Once you complete all the steps, download the solution function_app.py Python script to replace the one in your VS Code workspace.
- Download the Python Azure Function template and the requirements.txt with the ability to extract the change data of books table and upload them to Landing Zone.
wget https://raw.githubusercontent.com/pingcap-inc/tidb-course-labs/refs/heads/main/solution/microsoft-fabric-mirrored-database/function_app.pywget https://raw.githubusercontent.com/pingcap-inc/tidb-course-labs/refs/heads/main/solution/microsoft-fabric-mirrored-database/requirements.txt- Replace the function_app.py and requirements.txt in your VS Code workspace with the downloaded files.
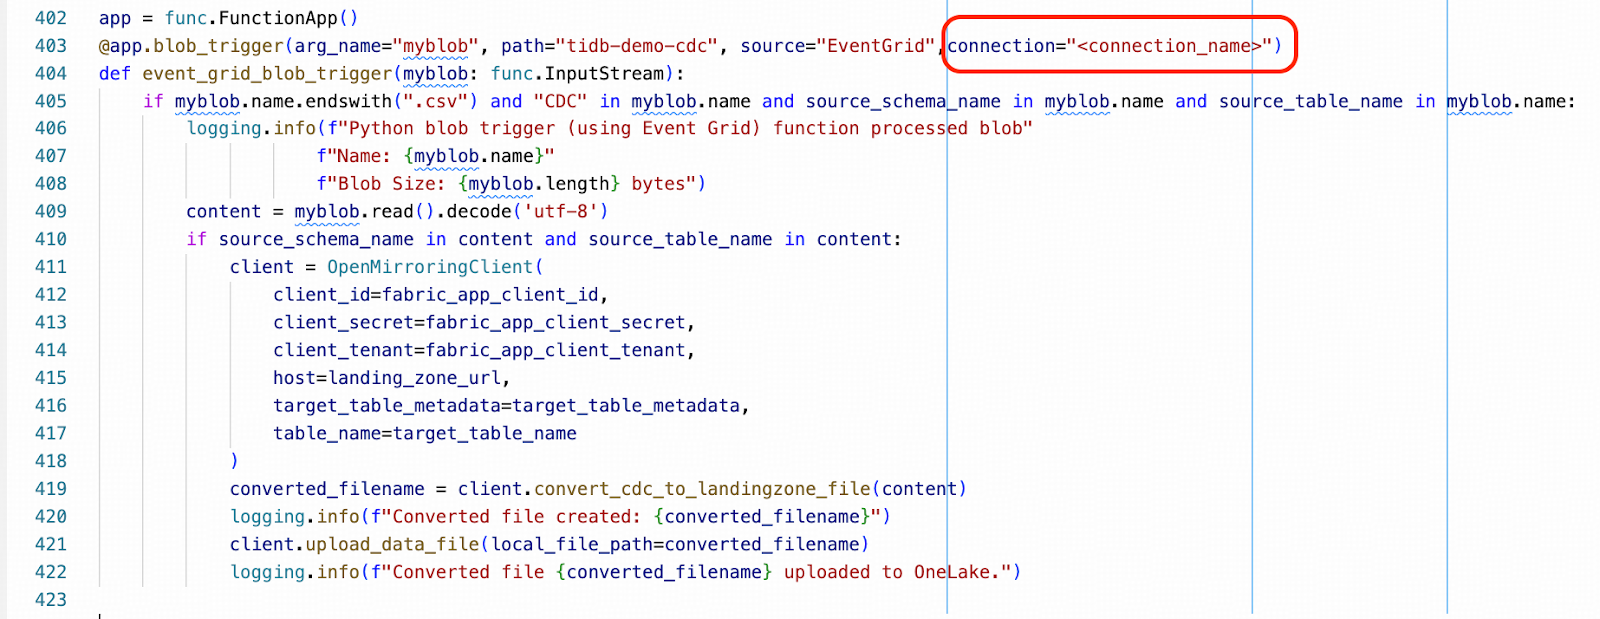
- Modify the Python script function_app.py around line# 12, replace the following placeholders with the actual values you copied from Steps 1 and 4.

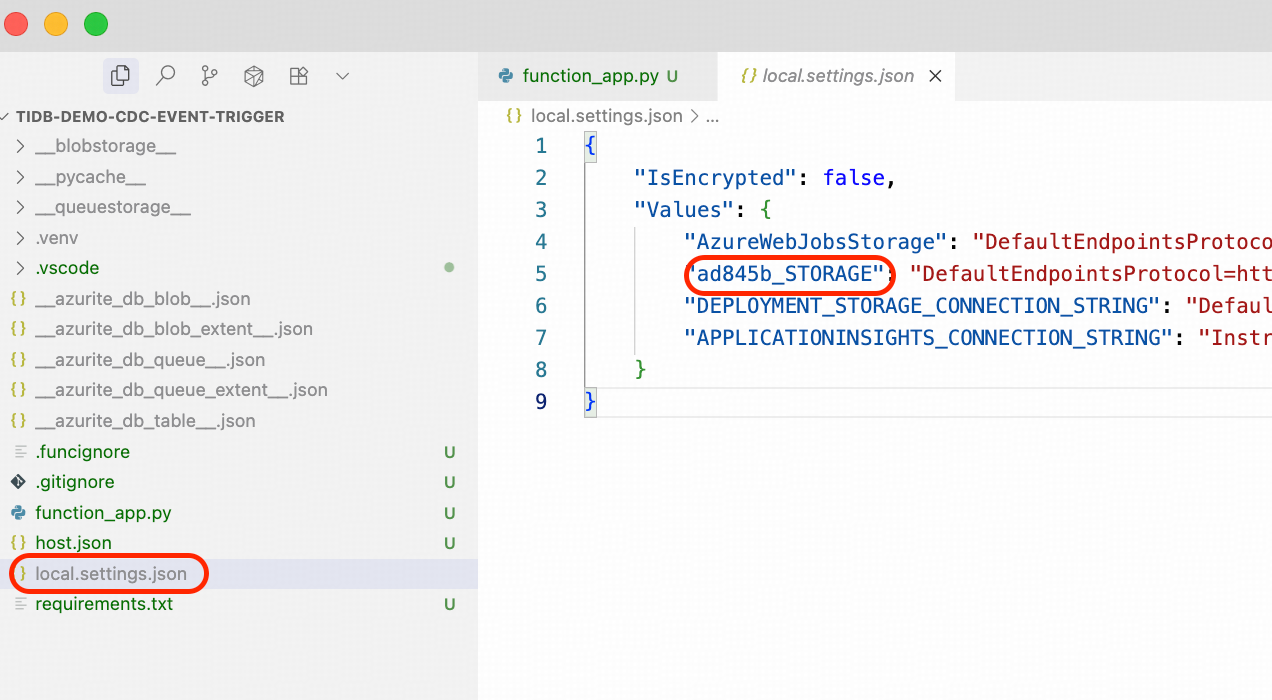
- Next, modify the Python script function_app.py around line# 403, replacing the placeholder for <connection_name> to the actual connection name. You can find your value in your local_settings.json file. It is similar to xxxxxx_STORAGE.
- Re-deploy the modified function to Azure Function App.
Step 7. Prepare Your TiDB and TiCDC Cluster
TiCDC (TiDB Change Data Capture) is a core component of TiDB that captures row-level data changes from a TiDB cluster and outputs them to a downstream platform in real-time. TiCDC can be enabled on both TiDB Cloud and TiDB Self-Managed cluster.
This step is only required for self-managed TiDB deployments. If you are using TiDB Cloud, you can skip it, as TiCDC is fully managed by the cloud service. The following instructions explain how to deploy a TiCDC cluster for a self-managed TiDB cluster.
For high availability (HA), our example deploys the TiCDC cluster across three availability zones, matching our TiDB cluster configuration. You can adapt this to your needs; while a single node is functional, multiple nodes across zones are recommended for production. Please note that your existing TiDB cluster can be located on-premises or in any cloud environment, such as AWS, GCP, or Azure.
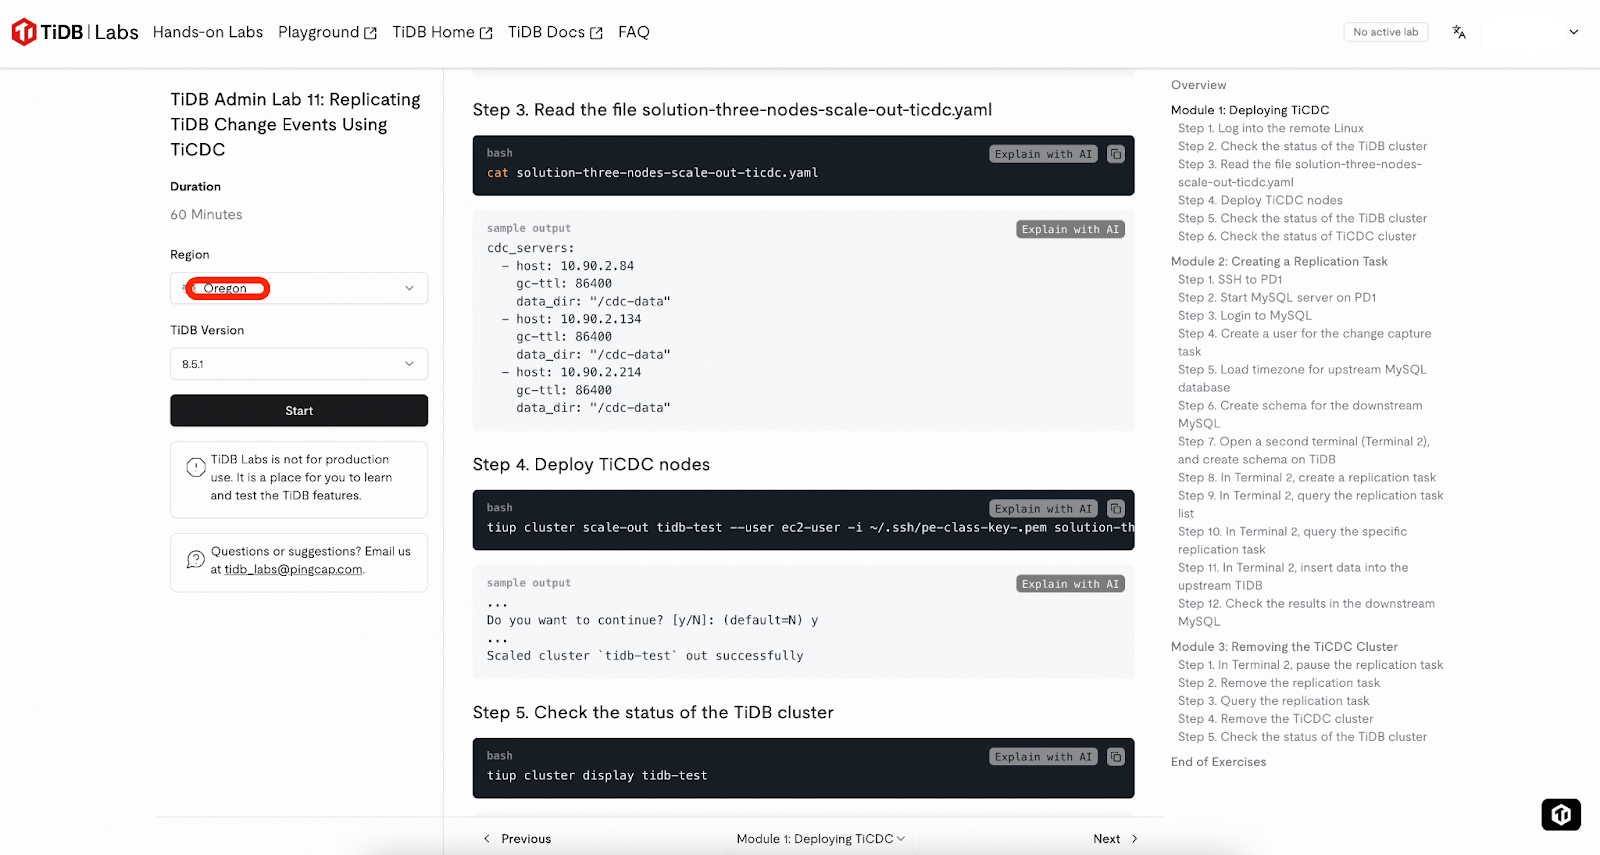
Tip for New TiDB Users
If you are new to TiDB and TiCDC, the tasks in this step may seem complex. We recommend using the sandbox environment (2 hours per instance) provided by TiDB Labs. Simply choose the Oregon region and start the lab, complete the guided Module 1 to provision a working TiDB cluster with TiCDC enabled, and then directly proceed to Step 6 – Prepare the Sample Schema.
- Prepare three additional nodes for the TiCDC cluster alongside your TiDB cluster. See the node requirements here. In our example, the private IP addresses for these nodes are 10.90.3.31, 10.90.3.17, and 10.90.3.40.
- Compose a yaml configuration for your TiCDC cluster, for example: example.yaml
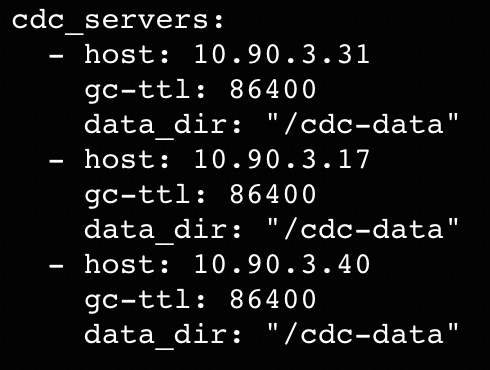
- Deploy the TiCDC cluster by executing the following tiup cluster scale-out command from your TiUP control machine. For a detailed explanation of the command’s parameters, please refer to the documentation.
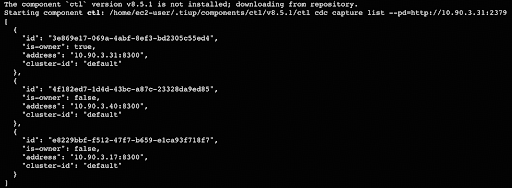
tiup cluster scale-out <tidb_cluster_name> --user <tidb_deploy_user> -i <auth_private_key> example.yaml -y- To verify the TiCDC cluster is running, execute the following command from your TiUP control machine. Replace <pd_private_address> with the private address of any Placement Driver (PD) node in your cluster. In our example the address is 10.90.3.21.
tiup ctl:v8.5.1 cdc capture list --pd=http://<pd_private_address>:2379
Now that you have the source TiDB and TiCDC cluster ready, we will prepare the data in the next step. Also note that TiCDC runs even with an unconfigured changefeed.
Step 8. Prepare the Example Schema
Tip for New TiDB Users: If you are using the sandbox environment provided by TiDB Labs, please do NOT follow Module 2. Follow this step instead.
We will demonstrate the replication using a books table within a bookshop database. This step involves creating this schema and table in your TiDB cluster.
- Download the schema creation SQL script.
wget https://raw.githubusercontent.com/pingcap-inc/tidb-course-labs/refs/heads/main/solution/microsoft-fabric-mirrored-database/bookshop_demo.sql- Connect to your TiDB cluster and execute the SQL script. For a detailed explanation of how to connect to the TiDB SQL layer by using mysql client, please refer to the documentation.
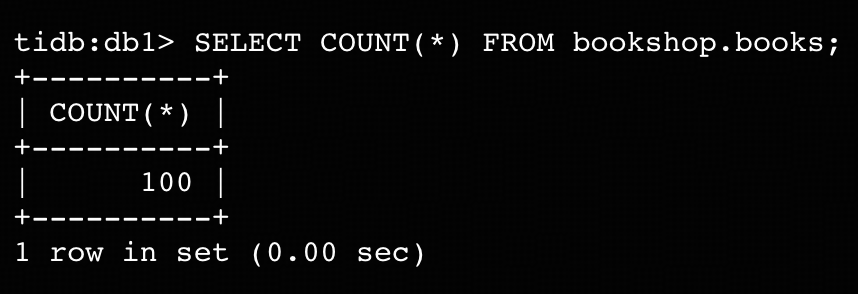
mysql> SOURCE bookshop_demo.sql- Confirm that there are 100 rows in table bookshop.books.
Step 9. Upload the Initial Table Data to Landing Zone
In this step, we use Dumpling to dump the entire books table from TiDB as a CSV file, and upload it to the Mirrored Database Landing Zone. Then, Fabric will push the data into OneLake automatically.
- Export the entire bookshop.books table to a CSV file. Our example executes this task on the TiUP control machine, but you can also run it from a different machine. For details on using Dumpling, please refer to its documentation. In the following command, ${HOST_TIDB_SERVER_IP} represents the IP address of one of your TiDB server instances you can connect to.
tiup dumpling:v8.5.1 -uroot -P4000 -h ${HOST_TIDB_SERVER_IP} --filetype csv --csv-null-value "N/A" -t 1 -o /tmp/books -T bookshop.books- Verify that the exported files are located in the /tmp/books/ directory.
ls -l /tmp/books/- Upload the bookshop.books.000000000.csv to bs_mirror1 Landing Zone by using the Python script you downloaded in Step 5. (If you run Dumpling on a different machine from the one used in Step 5, you may need to copy the CSV file to that machine first.)
python openmirroring_admin_solution.py --upload-data-file --table-name books_mirror1 --local-file-path /tmp/books/bookshop.books.000000000.csv- In the Microsoft Fabric portal, navigate to the integration-demo workspace and open the bs_mirror1 mirrored database. Verify the results as shown in the highlighted area of the following screenshot:
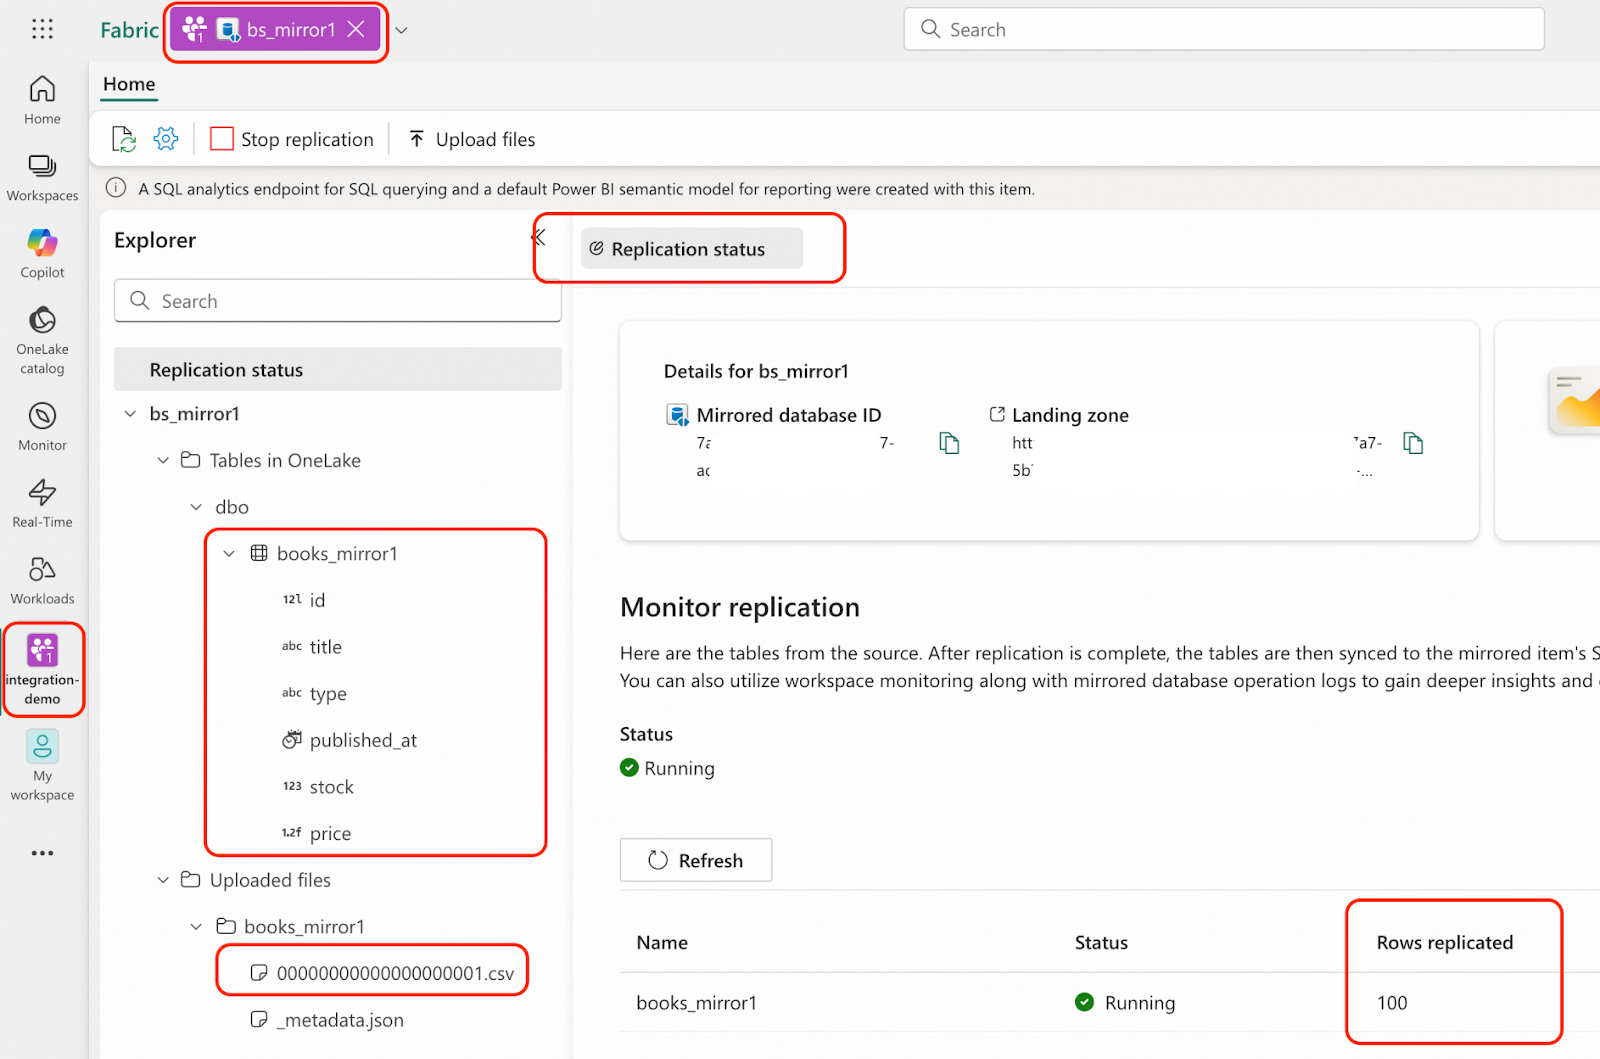
Now the mirrored database has the same data in the source database, but the real-time changefeed is not active yet.
Step 10. Start the TiCDC Changefeed for Incremental Replication
In this step, we will create a changefeed on TiCDC to instruct it to capture all the transactional changes on table bookshop.books and send the changes to Blob container tidb-demo-cdc, We have already deployed an event listener Azure function on this changefeed.

- Sign in to the Microsoft Azure portal, navigate to your storage account, and enable and retrieve the storage account key. For detailed instructions, please refer to this documentation.
- On the TiUP control machine, compose a changefeed configuration file – books.toml
[filter]

rules = ["bookshop.books"]

[sink]

protocol = "csv"

enable-partition-separator = false

[sink.csv]

null = "N/A"- Execute the following command to enable the changefeed. Replace the placeholders with the actual values of your storage account name and storage account key. ${HOST_PD1_PRIVATE_IP} represents the private IP address of any Placement Driver (PD) node in your cluster.
export ACCOUNT_NAME="<storage_account_name>"

export ACCOUNT_KEY='<storage_account_key>'

export CONTAINER_NAME="tidb-demo-cdc"

tiup cdc:v8.5.1 cli changefeed create --pd=http://${HOST_PD1_PRIVATE_IP}:2379 \ --sink-uri="azure://${CONTAINER_NAME}/tidb-test?safe-mode=true&account-name=${ACCOUNT_NAME}&account-key=${ACCOUNT_KEY}" \

  --changefeed-id="replication-task-1" \

  --sort-engine="unified" \

--config=books.toml- Use the following command to verify an activated changefeed, along with the expected output:
tiup cdc:v8.5.1 cli changefeed query \

--pd=http://${HOST_PD1_PRIVATE_IP}:2379 \

--changefeed-id=replication-task-1
Step 11. Apply Changes in TiDB and Verify Results in Microsoft Fabric Mirrored Database
- Connect to TiDB and make one update on the bookshop.books table.
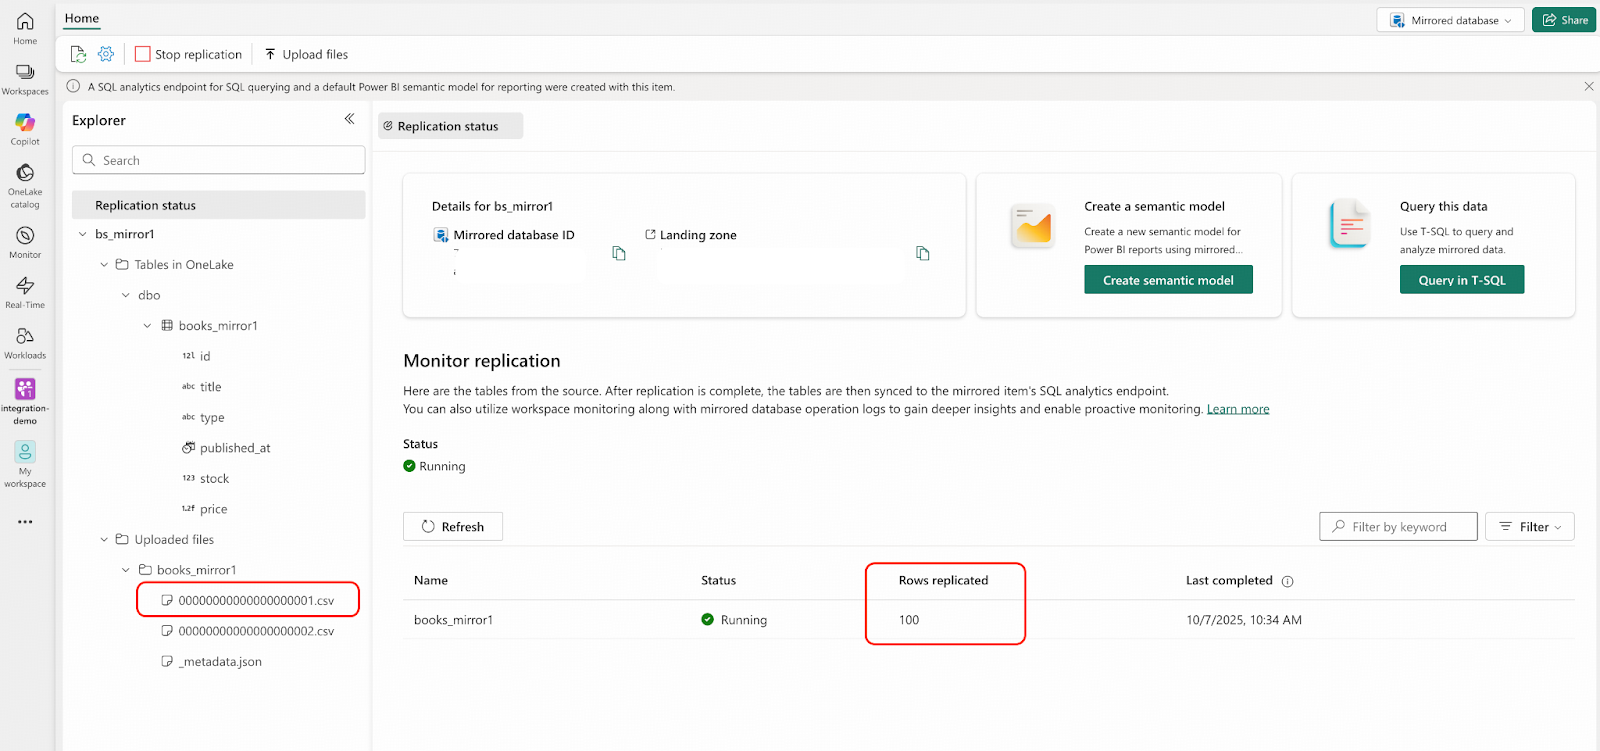
UPDATE bookshop.books SET price = price*0.9 WHERE id=1;- Navigate to the Fabric portal. You will see that a CSV file has been automatically uploaded to the Landing Zone. Note that the “Rows replicated” count will still show 100 and will not immediately update to 101.
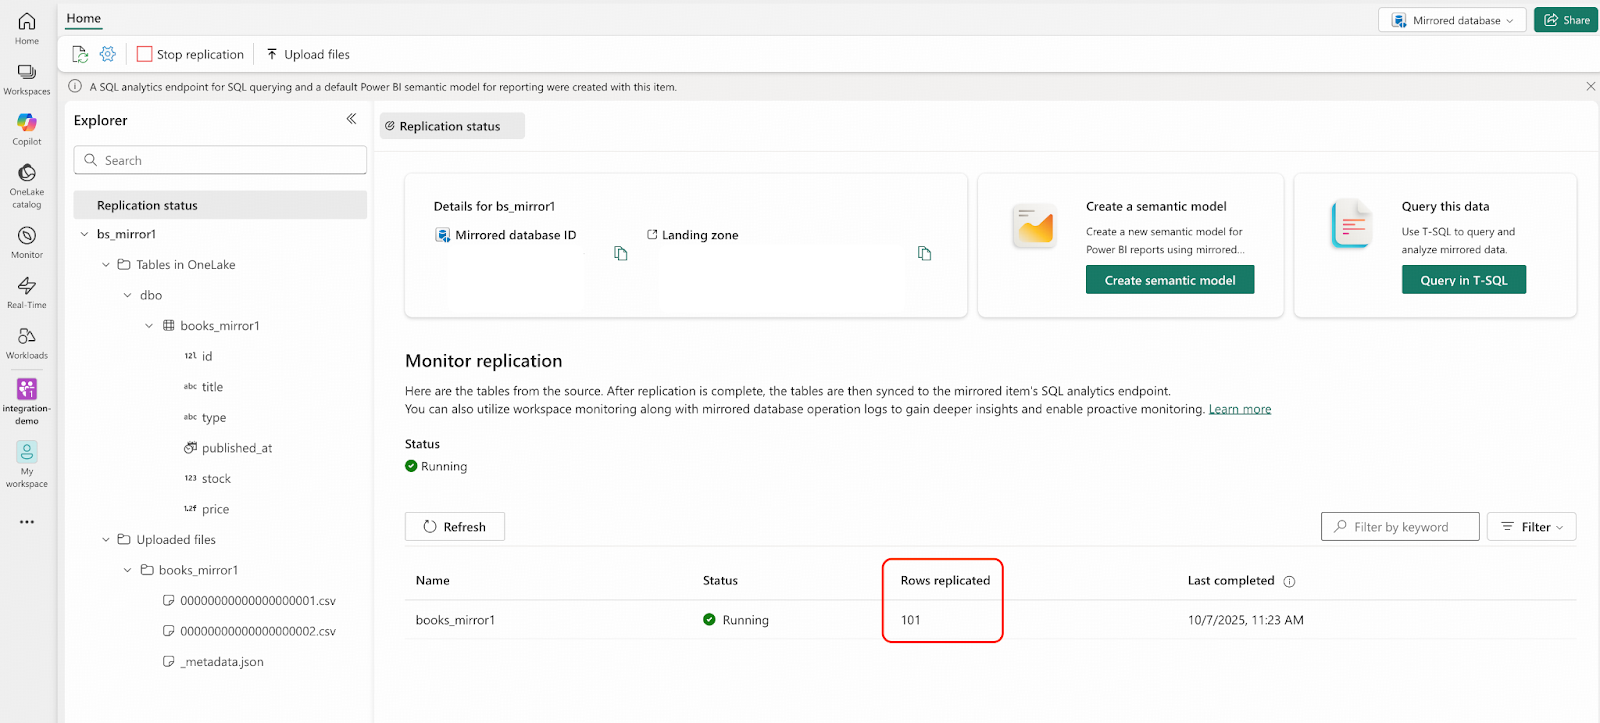
- After a short wait, when “Rows replicated” changes to 101, check the row with id = 1. The price in OneLake should be 0.9 times the value from the bookshop.books.000000000.csv file.
- Connect to TiDB and make one insert on the bookshop.books table.
INSERT INTO bookshop.books VALUES (NULL,'Introduction to TiDB', 'Education & Reference', NOW(), 100, 20.0);Verify Results in Microsoft Fabric
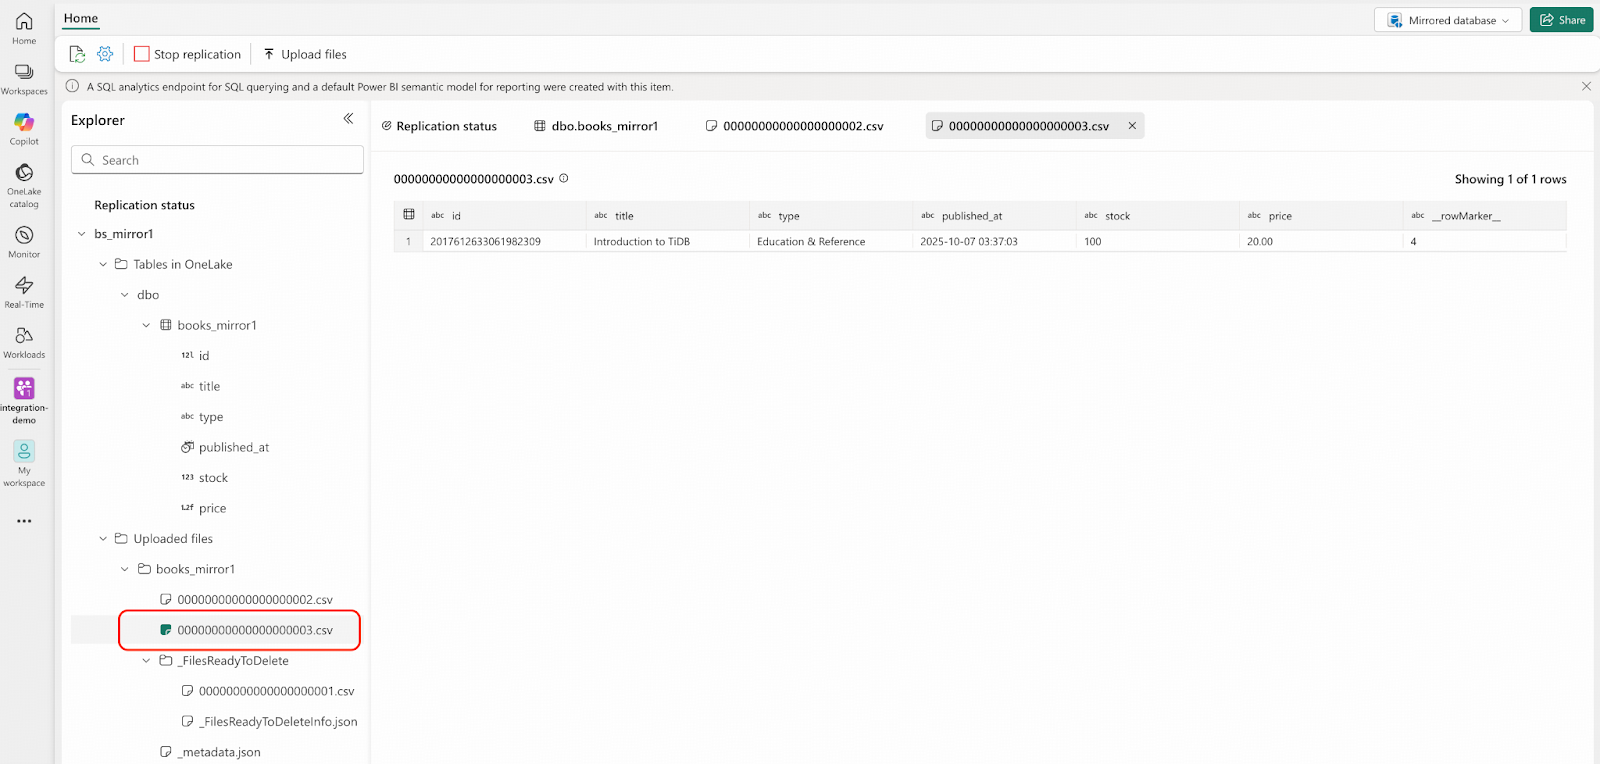
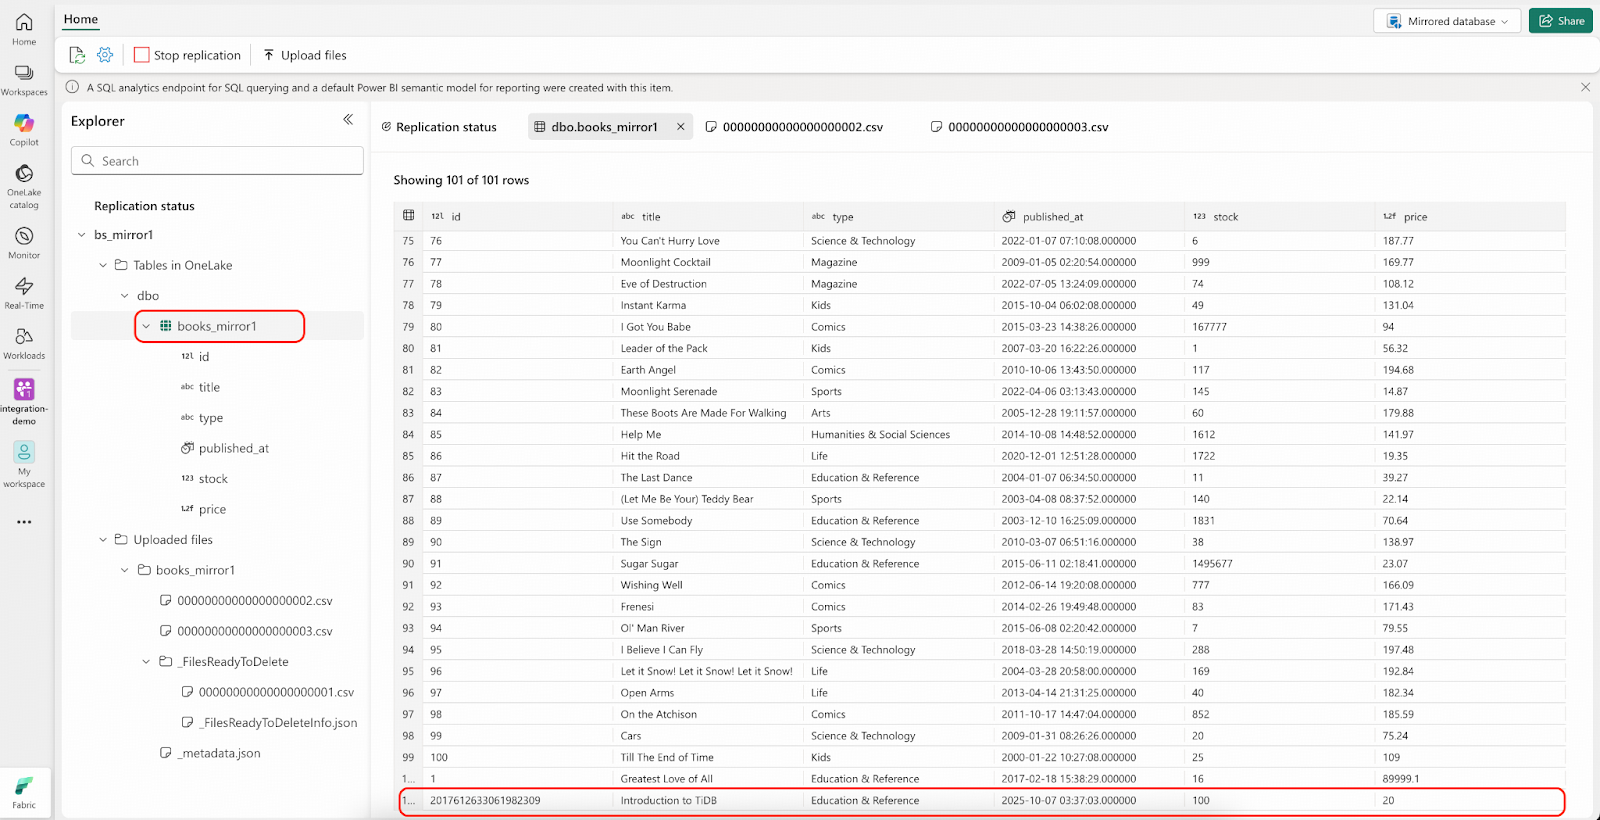
- Navigate to the Fabric portal. You will see that a CSV file has been automatically uploaded to the Landing Zone again, and the file name was incremented sequentially. Note that the “Rows replicated” count will still show 101 and will soon update to 102.
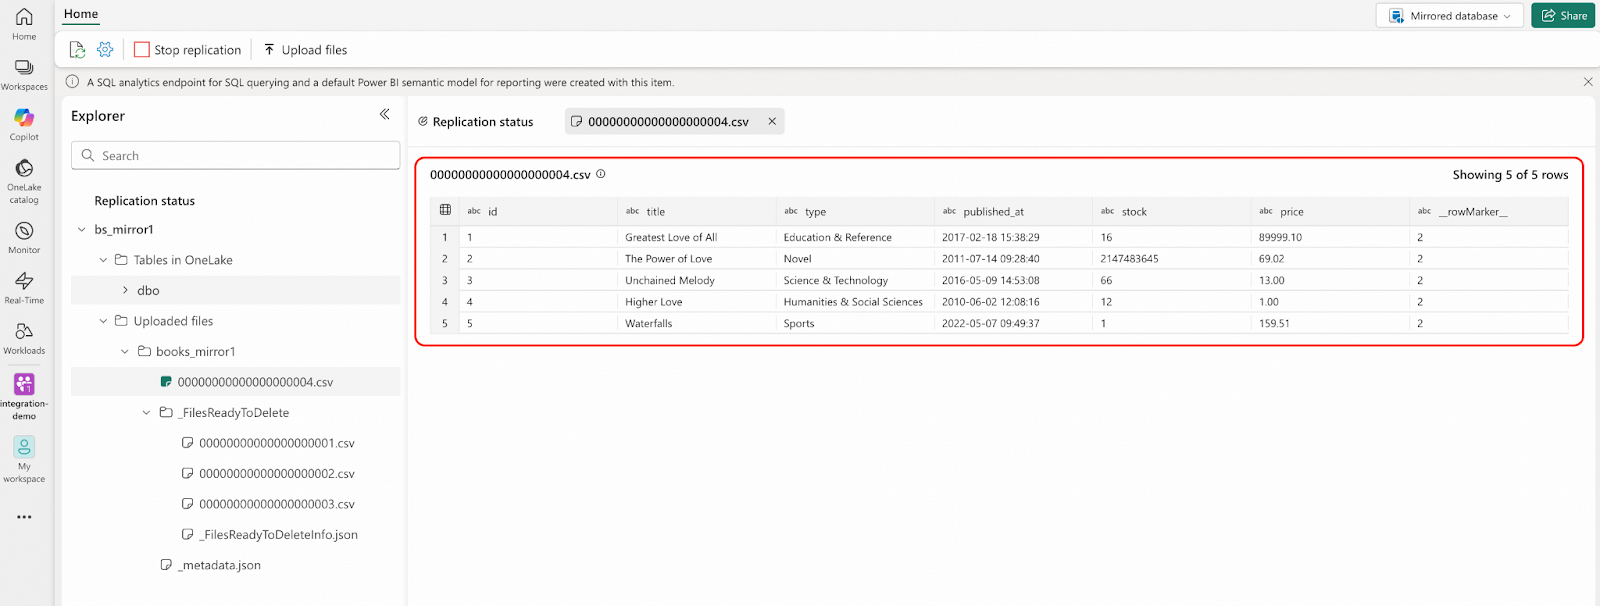
- Connect to TiDB and delete 5 rows from bookshop.books table.
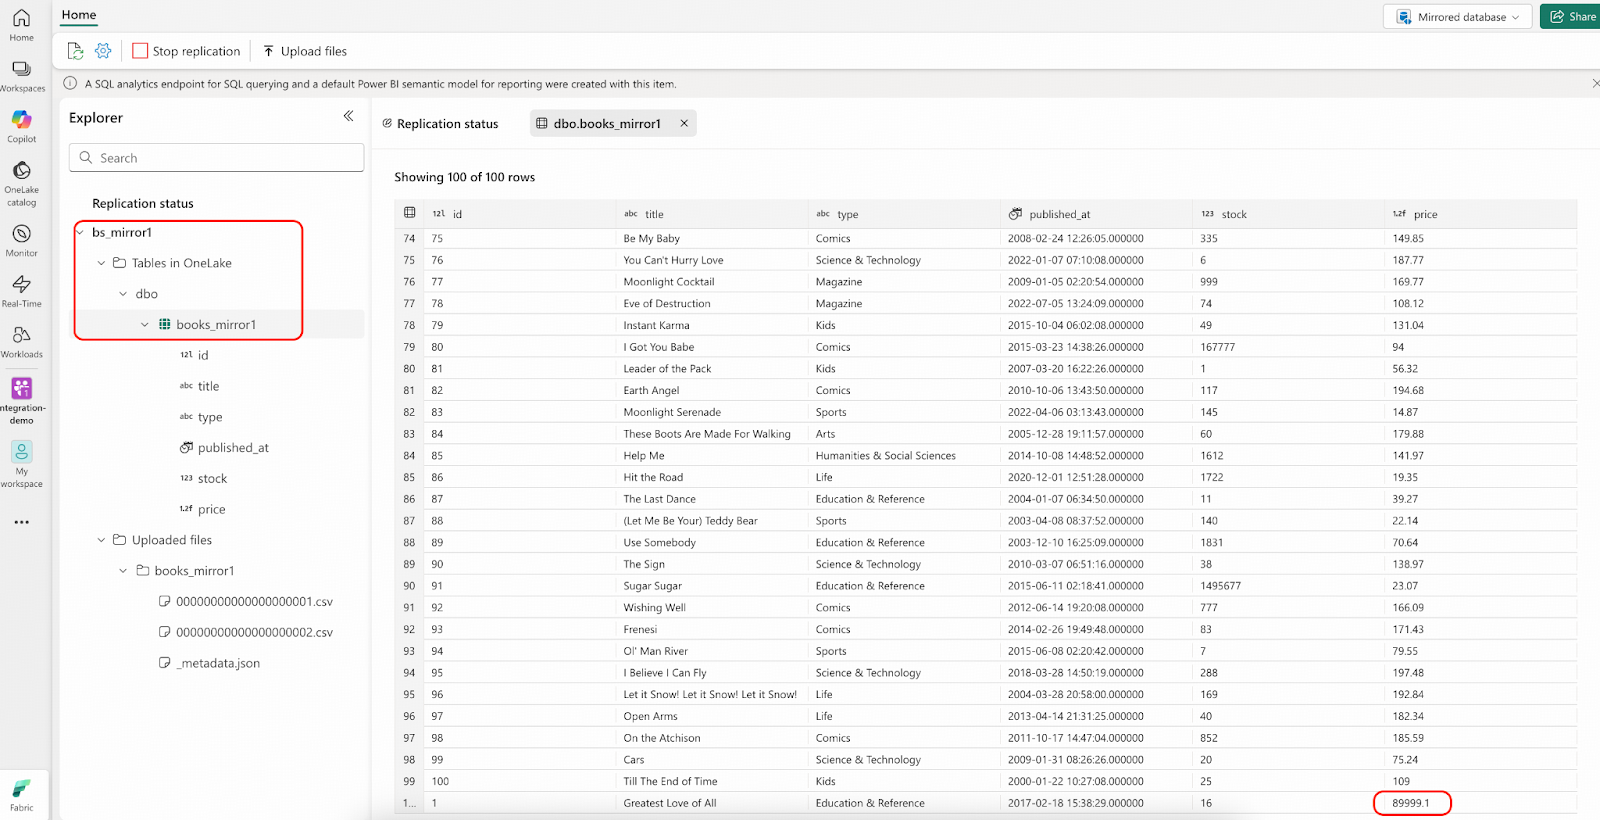
DELETE FROM bookshop.books WHERE id IN (1,2,3,4,5);- Navigate to the Fabric portal. You will see the result similar to the following screenshot:
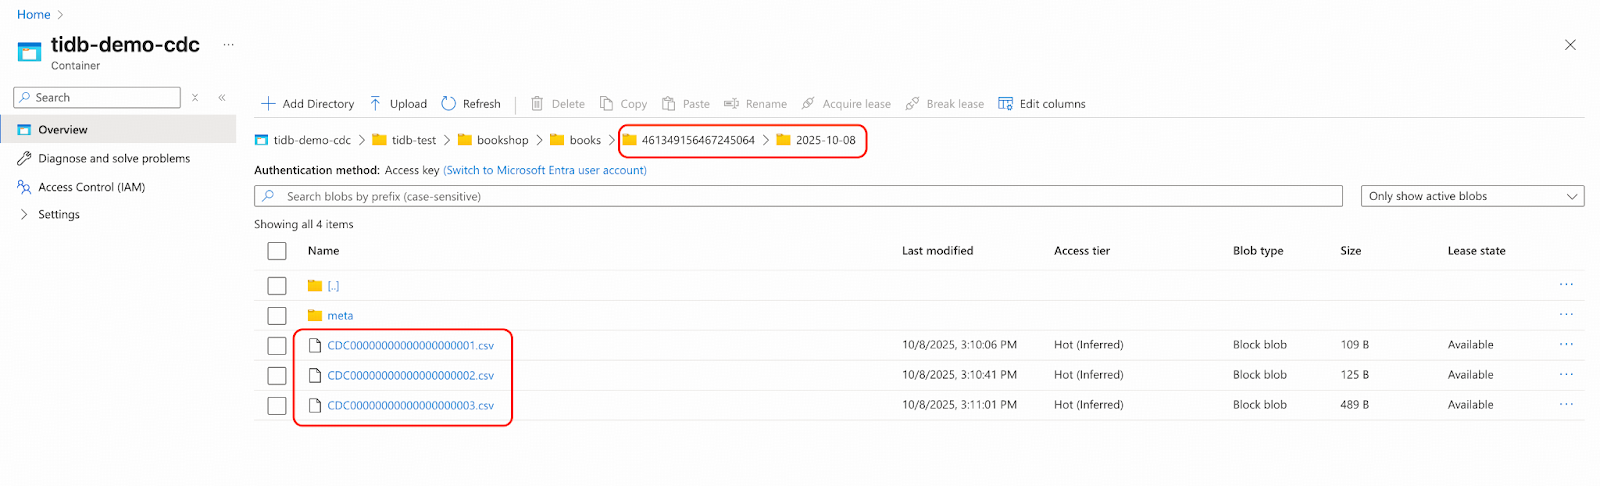
- Sign in to Microsoft Azure and navigate to the Blob container named tidb-demo-cdc to examine the staged changefeed CSV files. Note that your TSO and datetime folder names will differ from this example. Pay close attention to the CSV file naming conventions, which differ from the files in the Landing Zone in two key ways:
- They are prefixed with “CDC”.
- Their sequence numbers are one less than the corresponding files in the Landing Zone. This is because the first file in the Landing Zone represents a full data import, while these files contain only incremental changes.
For example: The file CDC00000000000000000003.csv here corresponds to 00000000000000000003.csv in the Landing Zone.
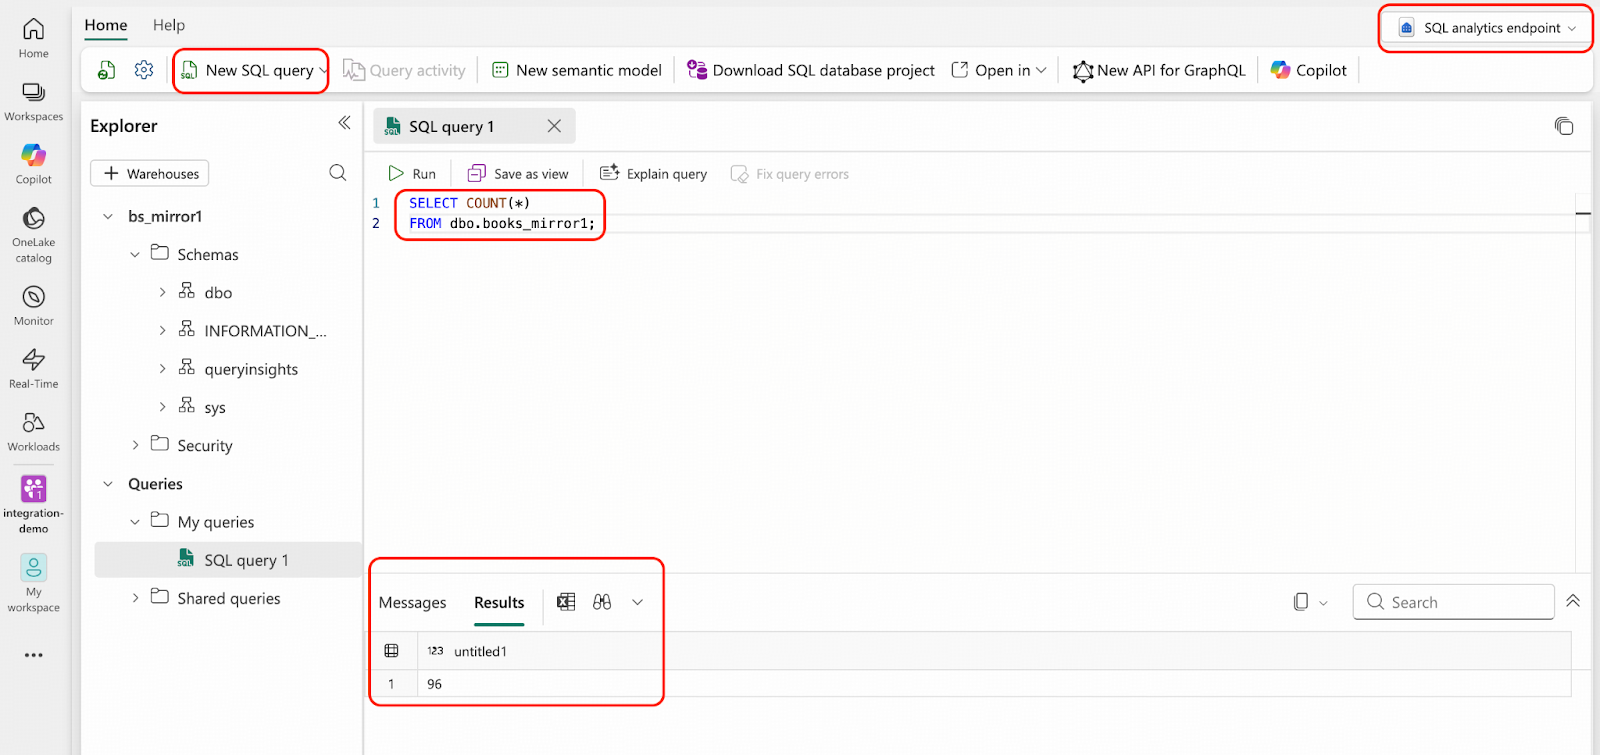
- From the SQL analytics endpoint, you can use T-SQL to verify there are 96 rows in your mirrored database.
Now that your operational data is replicating into OneLake in real-time, you can use all the features described in this document to analyze it immediately.
Best Practices
- Between Steps 9 and 10, the bookshop.books table remains unchanged, indicating a period of read-only activity or a pause in transactions. To eliminate this downtime and allow the application to continue processing transactions, you must use the –start-ts option when creating the changefeed in Step 10. Set the –start-ts value to the TSO (Timestamp Oracle) captured at the beginning of the Dumpling export in Step 9. This TSO (the value of Pos) can be found in this file /tmp/books/metadata from Step 9.
- Based on your business requirements, you can configure different retention policies for the mirrored database landing zone and the Blobs container.
Conclusion
This blog post demonstrated an integration solution for real-time data replication from TiDB to Microsoft Fabric using TiCDC and Open Mirroring. By following the detailed steps, users can seamlessly integrate their TiDB data into OneLake, leveraging Fabric’s powerful analytics and AI capabilities. This integration ensures data freshness and consistency, empowering businesses with timely insights for informed decision-making. If you want to know more about the data stream capture and replication capabilities of TiDB, please visit our TiCDC documentation.
Experience modern data infrastructure firsthand.
TiDB Cloud Dedicated
A fully-managed cloud DBaaS for predictable workloads
TiDB Cloud Starter
A fully-managed cloud DBaaS for auto-scaling workloads