TiDB Cloud is a fully-managed Database-as-a-Service (DBaaS) that brings everything great about TiDB to your cloud and lets you focus on your applications, not the complexities of your database.
In this 15-minute tutorial, you will learn how to use TiDB Cloud as the backend database for your Python application. We will be using Python and Flask to build a simple web application.
Here is an overview. We will first start a TiDB database in the TiDB cloud. Then, we connect to the database from our local machine and insert some data. We use Python and Flask to build up the web application. Finally, the data from the database is displayed on the webpage.
Before you begin
- Install Python (v. 3+)
Create a TiDB Developer Tier cluster
- If you do not have a TiDB Cloud account, click here to sign up for an account.
- Log in to your TiDB Cloud account.
- Click Create a Cluster to go to the plan selection page, and then click Get Started for Free in the Developer Tier plan.
- On the Create a Cluster page, set up your cluster name and root password. (In this tutorial, we will call our cluster demo).
- Note that the cloud provider is AWS by default, and then select the region which is close to you to create the cluster.
- The cluster tier is S1.dev by default.
- Click Submit.
Your TiDB Cloud cluster will be created in approximately 5 to 10 minutes.
Connect to TiDB Cloud
- Go to https://tidbcloud.com/console/clusters and sign in to your cluster.
- On the TiDB Cloud console, click Connect on the upper right of the panel. The Connect to TiDB dialog displays.
- Create the traffic filter for the cluster.
- Click Allow Access from Anywhere in Step 1. (Allow access from anywhere is OK for the purpose of this tutorial, but not recommended for production.)
- Click Create Filter.
- Click the Web SQL Shell tab.
- Click Open SQL Shell and enter the password for the cluster. You are now able to write SQL commands.
Insert sample data into TiDB Cloud
- Create a database using the SQL shell interface:
CREATE DATABASE demo; - Next, we create a user of the database. The user name is
'demo_client', and you should set your own password to replace'<pwd>', such as'123'.
CREATE USER;'demo_client'IDENTIFIED BY'<pwd>' - For the sake of simplicity, we grant all privileges to the user we just created. Again, it is not recommended in production:
GRANT ALL PRIVILEGES ON *.* TO 'demo_client'; - Create the “fruit” table:
CREATE TABLE demo.fruit (fruit_name VARCHAR(50)); - Insert some data into our database:
INSERT INTO demo.fruit (fruit_name) VALUES ('Apple');INSERT INTO demo.fruit (fruit_name) VALUES ('Orange');INSERT INTO demo.fruit (fruit_name) VALUES ('Pineapple'); - Check the input data:
SELECT * FROM demo.fruit;
You should be able to see the output similar to the following.
+------------+| fruit_name |+------------+| Apple || Orange || Pineapple |+------------+3 rows in set (0.1337 sec)
Query data from the webpage
We will use Flask, a popular web framework to build a simple web application in this tutorial.
- Open another terminal window, and install Flask:
pip3 install flask - In the same terminal window, install MySQL connector:
pip3 install mysql-connector-python-rf - Create a new file called
web.pyfor the web application, and copy the following code with the host address, user and password updated per our previous steps:Note: you can find the host address for TiDB Cloud in Connect to TiDB – Standard Connection – Step 2 in the TiDB Console, in the format of
xxx.xxxx.xxxx.xxxx.prod.aws.tidbcloud.com.# import necessary packagesimport flaskimport jsonimport mysql.connector# create the flask appapp = flask.Flask(__name__)app.config["DEBUG"] = True# configuration used to connect to TiDB Cloudconfig = {'host': 'xxx.xxxx.xxxx.xxxx.prod.aws.tidbcloud.com','port': 4000,'user': 'demo_client','password': '<pwd>','database': 'demo'}@app.route('/fruit', methods=['GET'])def index():conn = mysql.connector.connect(**config)cur = conn.cursor()cur.execute("SELECT * FROM fruit")row_headers=[x[0] for x in cur.description]myresult = cur.fetchall()json_data=[]for result in myresult:json_data.append(dict(zip(row_headers,result)))# return the results!return json.dumps(json_data)# run the appapp.run()4. In the terminal window, go to the directory with web.py, and then execute the command:
python3 web.pyIf everything runs smoothly, you should be able to see output similar to the following window.
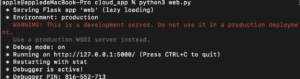
Screenshot of the terminal window
5. Open up a browser window, and type in address:
http://127.0.0.1:5000/fruitYou should be able to see the output on the webpage as follows:
[{"fruit_name": "Apple"}, {"fruit_name": "Orange"}, {"fruit_name": "Pineapple"}]
Want to learn more?
Ready to give TiDB Cloud a try? TiDB Cloud Developer Tier is now available! It lets you run a TiDB cluster for free for one year on Amazon Web Services. Make sure to follow us on Twitter to stay updated on TiDB Cloud news!
Spin up a database with 25 GiB free resources.


TiDB Cloud Dedicated
A fully-managed cloud DBaaS for predictable workloads
TiDB Cloud Starter
A fully-managed cloud DBaaS for auto-scaling workloads