
Efficient backend management is a cornerstone of successful application development. Navigating this realm poses significant challenges, especially when aligning with emerging backend trends. This often leads to time-consuming and repetitive architectural processes.
To solve this challenge, we introduce TiDB Serverless and TiDB Cloud Data Service (TCDS) —remarkable product offerings of TiDB Cloud.
TiDB Serverless is a fully managed, autoscaling Database-as-a-Service (DBaaS) solution built on TiDB, an advanced open-source, distributed SQL database. TiDB Serverless introduces a dynamic and cost-effective approach to data management, eliminating the complexities of upfront sizing, resource rebalancing, and idle assets. Meanwhile, TCDS, an integral part of TiDB Cloud, bridges the gap between database functionalities and comprehensive backend management, offering a low-code, fully managed backend-as-a-service solution.
We refer you to our previous post for an in-depth understanding of TCDS and its benefits. In this article, our focus shifts to demonstrating the practical applications of these services. We’ll guide you through the seamless process of transforming a standard CSV file into a fully functional RESTful API, leveraging the capabilities of TCDS.
Set up a TiDB Serverless Cluster
Take the steps below to create a free TiDB Serverless cluster:
- Sign in to your TiDB Cloud. Register a TiDB Cloud account if you haven’t got one.
- Follow the on-screen instructions to create a free Serverless Tier cluster within seconds.
Import a CSV File
For this guide, we have provided a CSV spreadsheet that contains sample employee data.
- Download the sample employee data CSV file provided for this guide.
- In the TiDB Cloud console, click the TiDB Serverless cluster name to access the cluster overview page. Select Import from the left navigation menu and upload the previously downloaded .csv file.

- In the Target section, specify the database as
testand enteremployeesas the table name.
- Click the Preview button to review the metadata information extracted from the uploaded .csv file. Mark the
empidcolumn as the Primary Key by selecting the checkbox.
- Click the Start Import button to initiate the import process. This creates the employees table within the test database, populating it with the 3000 records as sourced from the .csv file. This process should only take a few seconds.
Create a Data App
Assuming the data import process is successful, the next step is to create a Data App, which serves as the initial phase for generating REST Endpoints. Data App is a container that consists of a collection of objects like Endpoints. Please refer to our documentation for comprehensive details on managing a Data App.
- To create a Data App, simply click the Data Service icon and then click the Create Data App button.

- In the Create Data App screen, enter Employee Management for the Data App Name field, and select the containing cluster (in our case, Cluster0) for Link Data Sources. Then, click the Create button.

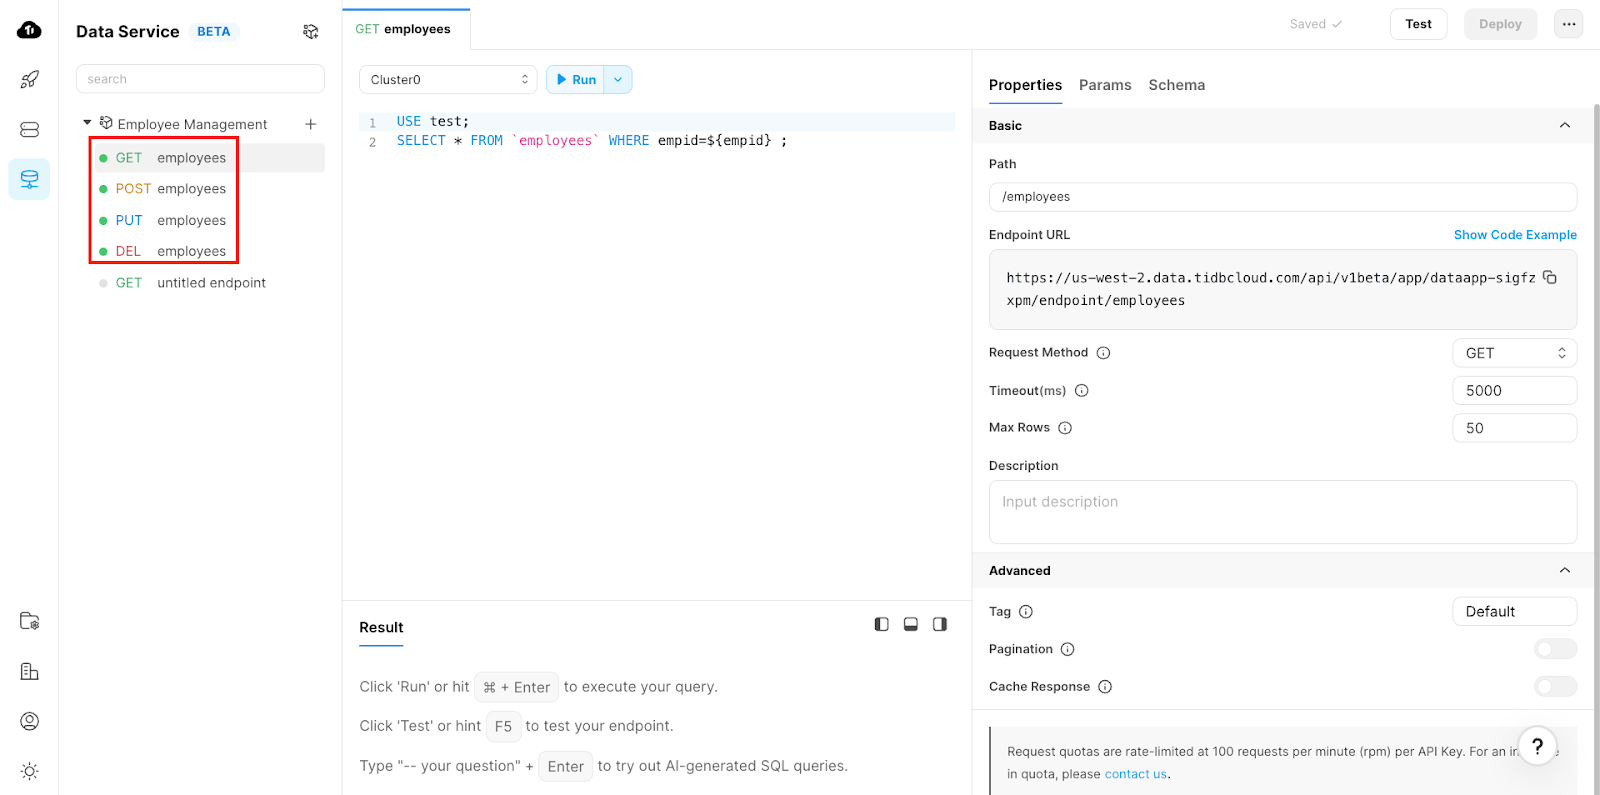
Create Endpoints
Congratulations on successfully creating your first Data App! Now, let’s proceed to create endpoints for the employee table.
- On the left navigation bar, find your Data App name, click the “+” symbol next to it, and select the Autogenerate Endpoint option that pops up.

- Configure Endpoint settings as specified in the image below:

- Enable the Auto-Deploy Endpoint option for immediate deployment.
- Click the Generate button to generate and deploy the configured endpoint automatically.
Within a matter of seconds, you’ll see your endpoints created and deployed, ready for you to explore and manipulate the employees data.
Create API Key
Before you start exploring your new endpoints, you’ll need to set up an API Key for secure authentication. Here’s how to create one:
- Navigate to your Data App’s main page by clicking Employee Management.
- Inside the Settings menu, find the authentication section and click the Create API Key button.

- In the Create API Key popup screen, specify the following:
- Description: Add a description for your API Key
- Role: Set the role to Read and Write since you’ll perform both actions on the
employeestable.
- Click Next to generate a Public Key and a Private Key.
- Copy and securely store both keys in a safe, easily accessible place. Remember, you won’t be able to access the Private Key again once you leave this screen.

- Click Done to return to the Data App home screen.
Your API Key is now created and ready to be used for authentication with your newly created endpoints. Make sure to keep the keys secure.
Explore Endpoints
Now that your API Key is set up, it’s time to delve into your newly created endpoints. There are two straightforward methods to accomplish this:
- API Docs: Utilize the built-in Swagger documentation provided by TiDB Cloud Data Services.
- Postman: Leverage the integrated Postman support within TiDB Cloud Data Service.
For the purpose of this blog, we will use API Documentation via Swagger UI. If you want to learn more about Postman integration, refer to our documentation.
- On the Data App home page, click View API Docs – Authorize.

- In the new browser window, you will find the API documentation generated through Swagger UI adheres to the Open API Specification. Click the Authorize button located in the top right corner.
- Enter the Public Key as the username and the Private Key as the password—both of which were obtained during the API Key creation process.

That concludes the process. You can now create, retrieve, update, and delete employee data through the secure endpoints using the POST, GET, PUT, and DELETE methods.
Conclusion
With TiDB Cloud Data Service, you can easily turn your business data into simple REST Endpoints, just like what we did in this post – converting a CSV into REST APIs in just a few minutes. Remember that this is just the tip of the iceberg when it comes to the capabilities of TiDB Cloud Data Services. As you explore further, you’ll uncover a spectrum of features designed to amplify your application development with simple and efficient backend management.
For more information on TiDB Cloud Data Services, refer to our documentation.
Harness the power of TiDB Serverless and TiDB Cloud Data Services now!
Spin up a database with 25 GiB free resources.


TiDB Cloud Dedicated
A fully-managed cloud DBaaS for predictable workloads
TiDB Cloud Starter
A fully-managed cloud DBaaS for auto-scaling workloads