


To navigate the dynamic cryptocurrency market, investors always look for a sophisticated crypto ETF insights app that provide them with the necessary insights. Traditional price-tracking websites like CoinMarketCap offer a snapshot of the market. Yet, they often present challenges, particularly when investors seek deeper, personalized insights from an overwhelming volume of data.
This tutorial delves into building an AI-powered crypto ETF insights app using TiDB Cloud Data Service (TCDS), a fully-managed, low-code backend-as-a-service solution, and OpenAI’s generative pre-trained transformers (GPTs). We’ll explore how to harness the power of these technologies to create a user-friendly and adaptive tool that empowers investors to gain deeper insights into potential ETF stars within the ever-evolving crypto landscape.
NOTE: The tool developed in this series is for illustrative purposes only and doesn’t guarantee real-time trading prices. Its primary focus lies in showcasing the potential of AI-driven data analysis techniques, not providing actionable trading advice.
Prerequisites for Building a Crypto ETF Insights App
Before you begin, you will need to set up the following:
- TiDB Cloud account and a free Serverless Tier cluster on TiDB Cloud. For details, see TiDB Cloud Quick Start.
- Python 3
- Git
- OpenAI account with Plus Plan.
Set Up Your Data Environment
In this section, we guide you through establishing your data groundwork. You will create a crypto_demo database and a crypto_trends table within the database. Furthermore, you will import the pricing information for the top 5 trending cryptocurrencies over the last two years into the crypto_trends table.
Get Database Connection Info
- In the TiDB Serverless cluster console, navigate to the cluster overview page and click the Connect button on the top right corner.

- Find the database connection parameters on the connections info page under the Parameters tab.

Note: TiDB Serverless does not have a password by default. You must click the Generate Password button to create a new one.
Configure & Load Crypto Currency Data
- Clone the project repository by executing the following command in your terminal (or command prompt for Windows users):
git clone https://github.com/tidbcloud/ccxt-web3-bot.git - Navigate to the project’s root directory ccxt-web3-bot:
cd ccxt-web3-bot - Install the project dependencies listed in requirements.txt:
python3 -m pip install -r requirements.txt - Open the config.json file in the editor of your choice. We’re using ‘vi’ in the example. Enter the connection information obtained in the previous step and save the file.
% vi config.json { "db_host":"", "db_port": 4000, "db_user": " ", "db_password" : " " } - In your terminal window, execute the following command to create the target data and table and import the dataset:
python3 ./main.py
The above command creates the crypto_demo database and a crypto_trends table. It will also import the data for the top 5 cryptocurrency price trends from the last two years into the database. Upon completion, you will see a confirmation message in the terminal indicating the successful data import.
Create a Data App
In this step, we’ll set up a Data App within TiDB Cloud Data Service. A Data App acts as a framework for organizing your backend services, enabling the generation of REST endpoints to interact efficiently with your imported cryptocurrency data.
To create a Data App:
- Navigate to the TiDB Cloud console, select Data Service from the left navigation menu, and click the Create Data App button.
- Configure a standard data app as below:
- App Name: Enter web3-demo in the Data App Name field.
- Data Sources: Select a cluster to associate with your app. For this example, choose “Cluster2”.
- Description: Write “App for retrieving cryptocurrency prices”.
- Data App Type: Leave the field at its default setting.
- Click the Create button to finalize the Data App creation. You’ll be redirected to the Data App Home page.
A Getting Started with Data Service tutorial will pop up for first-time users. However, for this tutorial, we’ll ignore it and proceed to detail how to manually create the endpoints for your app.
Create HTTPS GET Endpoints
This section guides you through setting up the required HTTPS GET endpoints. We recommend exploring our previous blog post – Mastering TiDB Cloud Data Service – for enthusiasts eager to dive deeper into endpoint creation and management.
GET /list_cryptos
The GET /list_cryptos endpoint lists all cryptocurrencies. Follow the steps below to create the endpoint:
- On the left navigation bar of the web3-demo app, click the “+” symbol and select the Create Endpoint option.
- Navigate to the Properties tab to configure the endpoint properties:
- Path: Enter
/list_cryptosto define the endpoint’s access path. - Request Method: Set to GET to specify the type of request this endpoint handles.
- Endpoint Name: Automatically generated based on the path value by default. Ensure it accurately reflects the endpoint’s function.
- Description: Enter a brief description such as “lists all available cryptos.”
- Path: Enter
- Configure the SQL that defines the business logic for the endpoint:
SELECT DISTINCT crypto FROM crypto_demo.crypto_trends; - Deploy your endpoints to make them accessible to external clients:
- Click on the endpoint to open its details.
- On the top-right corner, click the Deploy button. A Review Change dialog pops up.

- Perform a final review of the endpoint configurations.
- Click the Deploy button again to publish the endpoint.

GET /trading_data_by_crypto
The GET /trading_data_by_crypto endpoint retrieves the pricing trend data for a specific cryptocurrency and data range. Follow similar steps as the GET /list_cryptos endpoint:
- Initiate the endpoint creation.
- Configure the endpoint properties:
- Path: Enter /trading_data_by_crypto
- Request Method: Set to GET as the method
- Endpoint Name: Automatically generated
- Description: Type “Retrieve crypto’s pricing trend data”
- Configure SQL:
SELECT * FROM crypto_demo.crypto_trends WHERE `crypto` = ${crypto} and `time` between ${start_datetime} and ${end_datetime}; - Repeat the deployment process as you did with the
GET /list_cryptosendpoint to publish the endpoint.
Integrate DataApp with GPTs
Integrating Endpoints with GPTs requires API documentation in JSON or YAML format and an encoded API key to access the endpoints.
Get Configuration for GPT Integration
TCDS provides a configuration tile within the Data App home page to access GPT’s integration-related information. To obtain the configuration:
- On the left navigation panel of the TCDS interface, click on the Data App name (in our case, it’s
web3-demo). Then, click the Get Configuration button in the Integration with GPTs tile on the right.
- In the Integrate with GPTs pop-up window:
- Copy the API Specification URL for the next step. This is the URL of the API Documentation
- Click the Create API Key button to generate a new API Key. This also automatically creates an encoded API key.
- Copy the API Key Encoded value for the next step.
Create & Configure the GPT
You can integrate your Data App’s endpoints with GPT using the API documentation URL and encoded API key.
- Navigate to your ChatGPT, select the Explore GPTs option, and then hit the Create button on the right to start setting up the GPT.
Note: This feature is only available for ChatGPT Plus users.

- Set up common parameters for this GPT application in the Configure tab. In the Create tab, you can prompt ChatGPT to generate these automatically.

- Click the Create new action button located at the bottom of the page. The Add Actions window pops up.
- In the Add Actions window, configure the action as instructed below:
- Click the Import from URL button, paste the API Specification URL you obtained in the GET Configuration for GPTs Integration step, and then click the Import button. This automatically populates the API documentation into the Schema field.
- Click the gear icon on the right of the Authentication section. The Authentication configuration window pops up.
- Configure the Authentication:
- Set Authentication Type as the API Key
- Paste the encoded API key you obtained earlier in the Access Configuration for GPTs Integration step.
- Click the Save button to save the Authentication configuration.

- As the final step, click the Save button at the top-right corner of the interface, choose Only me as the publish type, and click the Confirm button to publish the GPT.

With your GPT set up and integrated with the Data App, let’s test its functionality with a simple question.
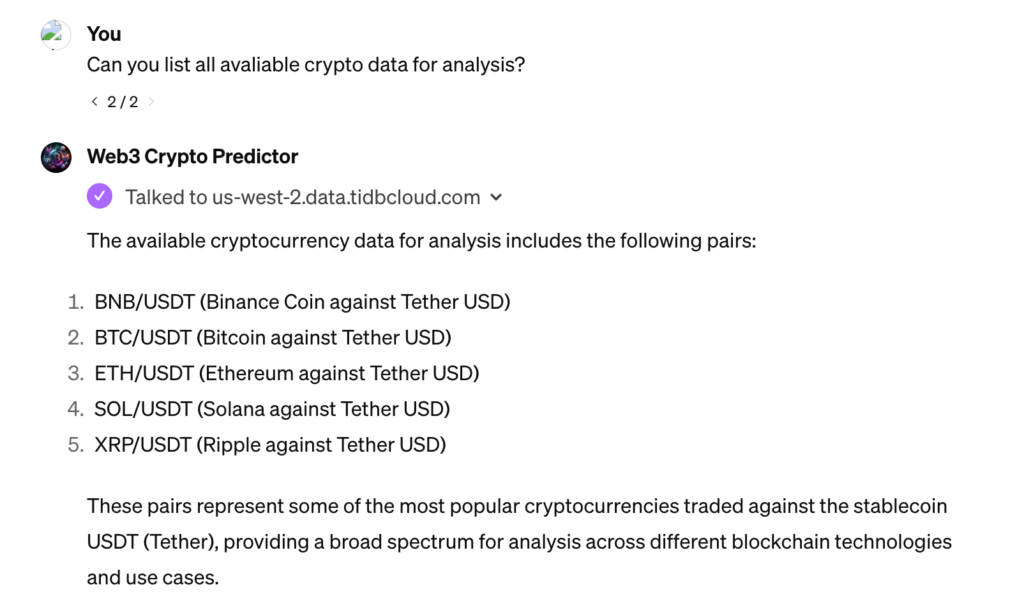
As you can see, the GPT attempted to query the REST endpoints and provided us with the list of 5 cryptocurrencies available for analysis. If you have followed along and seen a similar result, congratulations! You can now use this tool to explore cryptocurrency insights and potential trading trends.
GPT in Action – Test Out Your Crypto ETF Insights App
Now, it’s time to put our GPT in action. As a newcomer in the Web3 community, you might be curious about potential cryptocurrencies for investment and the optimal purchase price. Let’s now discuss the three questions that may provide the necessary insights for you.
Question 1: Now that we have the available cryptos, can you compare the volatility of all cryptos side-by-side? Please plot them in a chart.
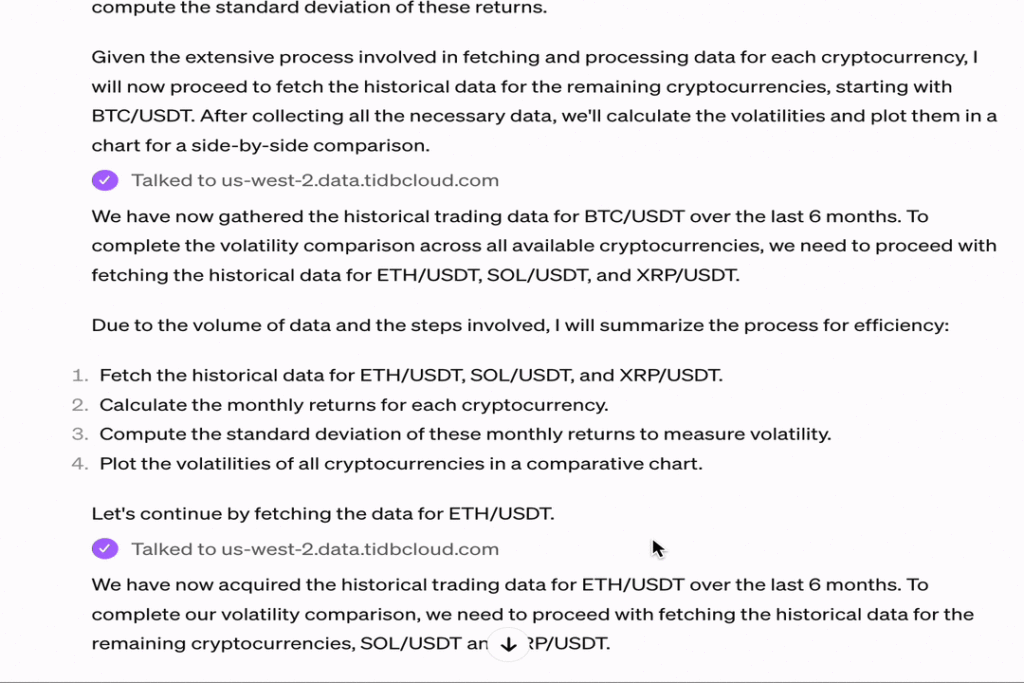
GPT approached the query in the following steps:
- Data retrieval: Fetching the necessary data using DataService API, specifically focusing on historical price data for the cryptocurrencies.
- Analysis: Processing this data to calculate volatility, typically measured as the standard deviation of daily returns over a specified period.
- Visualization: Generating Python code that leverages libraries like Matplotlib or Seaborn to create a bar chart visualizing the volatility of each cryptocurrency.
The resultant bar chart depicts the relative volatility of BNB, BTC, ETH, SOL, and XRP, offering insights into their risk profiles. Cryptocurrencies with higher volatility, indicated by taller bars, suggest larger price swings, potentially higher investment risk, and greater opportunities for return. Based on this, we can safely assume that BTC and ETH could be the safest bets.
Question 2: Based on historical volatility analysis, what are the potential minimum and maximum price swings we could see within the next 6 months? Please plot it on a bar chart.
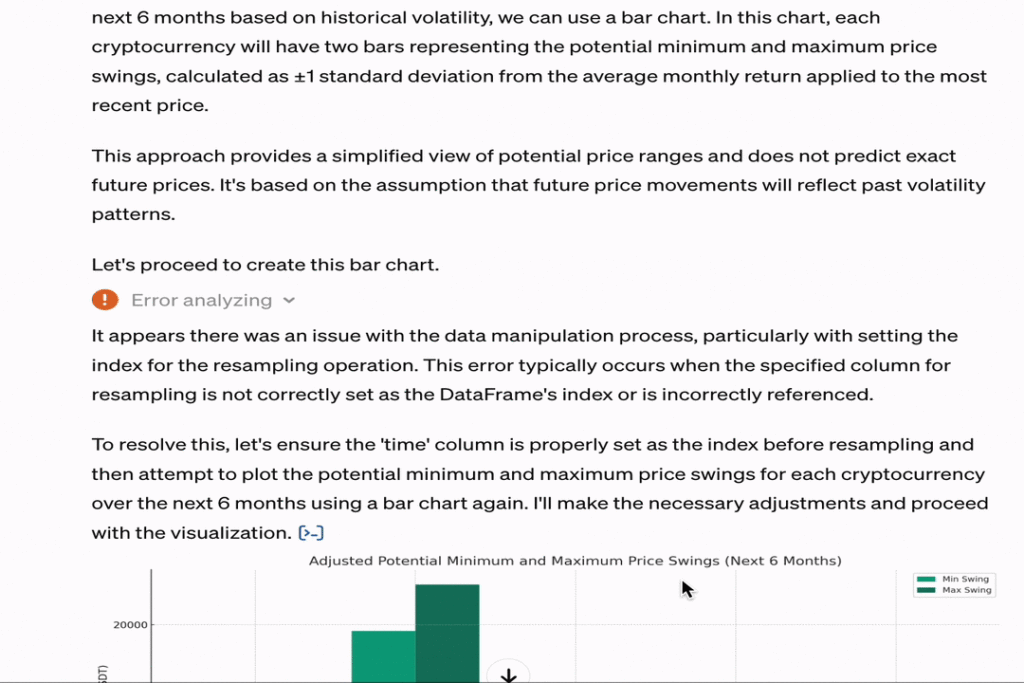
Here’s how GPT approaches the question:
- Assumption of historical continuity: Assuming that future volatility mirrors historical patterns despite the limitations of this approach in financial forecasting.
- Calculation of swings: Historical volatility is used to estimate potential minimum and maximum price changes over the next six months.
- Charting predictions: Visualizing these predictions in a bar chart
Question 3: Based on the above analysis, what could be a potential cryptocurrency to invest in, and at what price point?
In addressing this question, GPT does the following:
- Factor analysis: Begin by analyzing key factors that influence cryptocurrency potential, focusing on a balance between stability and potential for growth.

- Recommendation: Based on these analyses, GPT highlights ETH and XRP as cryptocurrencies that effectively balance risk and reward, suggesting them as potential investment opportunities.

Conclusion
Integrating AI through GPTs and TCDS represents a significant leap forward in the efficiency and effectiveness of developing AI and data-driven applications like the crypto ETF insights app featured in this post. By harnessing the power of GPTs for data retrieval, analysis, and visualization, developers can quickly derive meaningful insights from vast datasets, turning raw data into actionable intelligence with minimal effort.
TCDS is poised to play a pivotal role in diverse scenarios of AI and data-driven applications. With its generous free quota offer and the frictionless developer experience of TiDB Serverless, we strongly encourage you to explore TCDS to unveil its convenience and benefits for application development.
Spin up a database with 25 GiB free resources.


TiDB Cloud Dedicated
A fully-managed cloud DBaaS for predictable workloads
TiDB Cloud Starter
A fully-managed cloud DBaaS for auto-scaling workloads